
You can save a lot by building your own furniture, and these 24 projects give you practical, budget-friendly options for every room. I’ll show simple plans—floating shelves, a platform bed, a media console and more—using common tools, basic joinery, and smart hardware choices so your pieces last. Start with easier projects to build skill, then move to the ones that add the most function and style to your home.
Build a Simple Floating Shelf
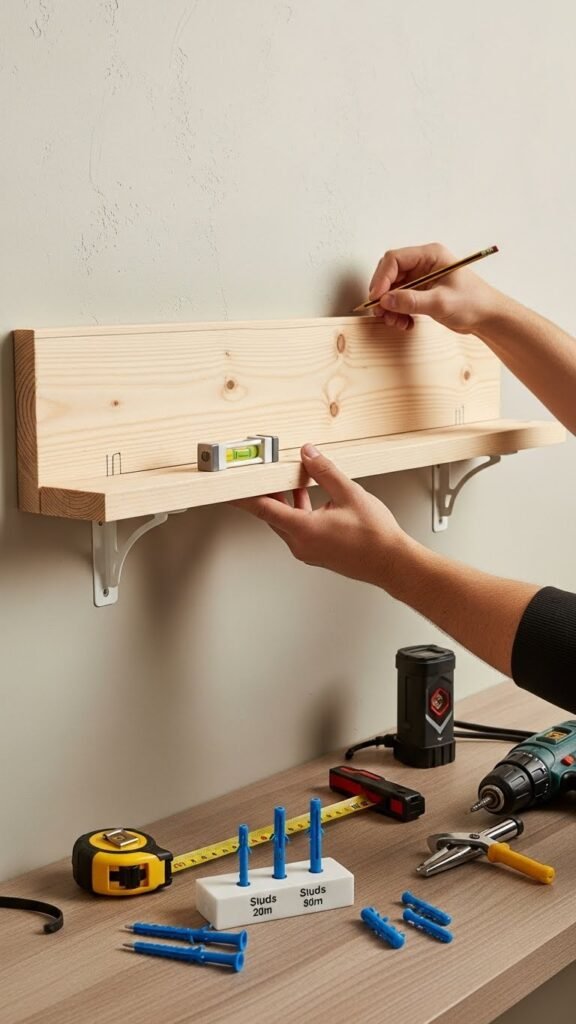
Start by choosing a straight, sturdy board and the right wall anchors for your drywall or studs. Measure, mark studs, and install floating hardware level and secure.
Slide the board onto brackets, check stability, then sand and apply paint finishes you love. You’ll keep screws hidden, minimize clutter, and adjust height for function.
This gives you freedom to customize storage quickly and cheaply.
Construct a Basic Coffee Table
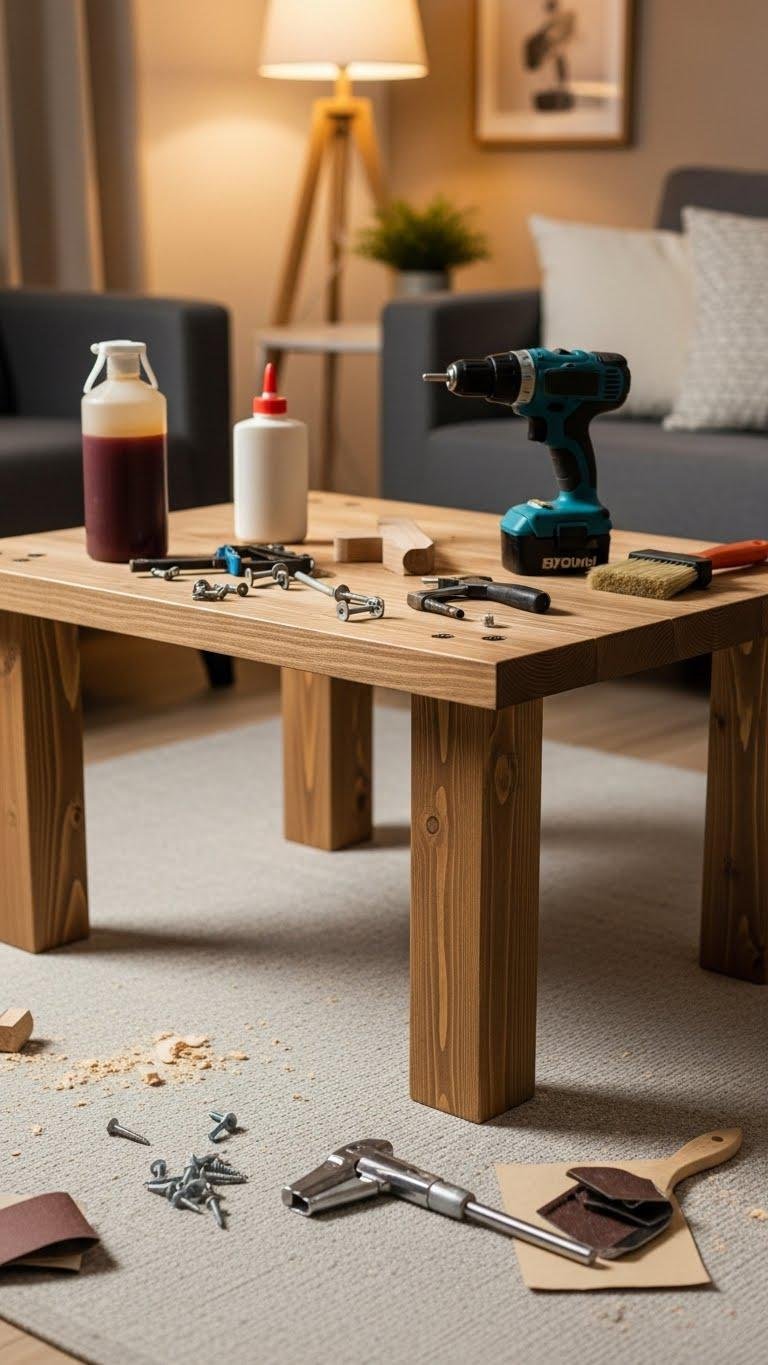
Pick a design that fits your space and skill level—then gather a solid tabletop, four legs (or a base frame), wood glue, screws, a drill, sandpaper, and a finish of your choice.
Cut and dry-fit parts, apply glue and screws for joint reinforcement, sand smooth, and choose staining techniques that match your style.
Seal, attach legs, and enjoy a durable, customized coffee table you made yourself.
Assemble a Platform Bed Frame
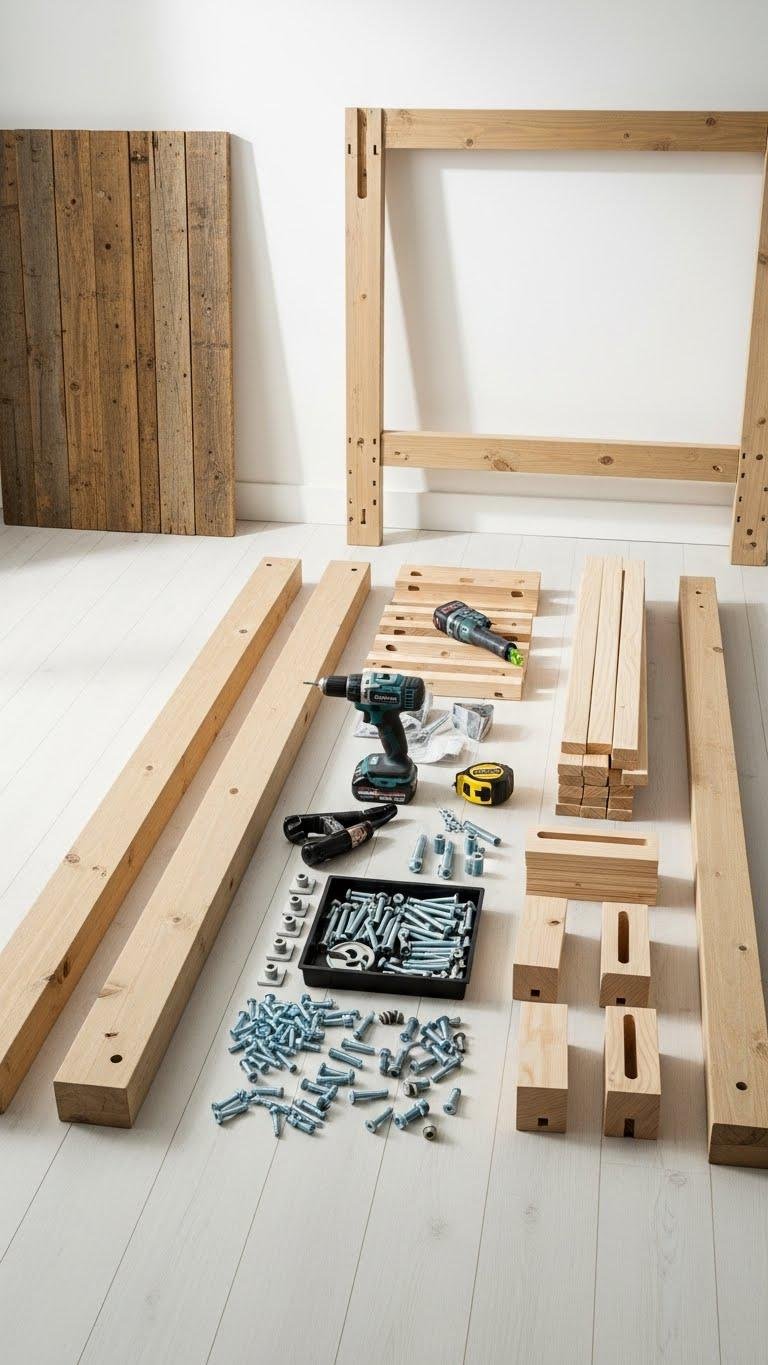
Before you assemble the frame, lay out all the components—side rails, end rails, slats or a sheet of plywood, leg blocks or legs, hardware, and tools—so you can confirm fit and spot any defects; this quick dry-fit saves time and prevents mistakes during final assembly. You’ll cut to size, use pocket screw joinery for strong joints, attach legs, and add a DIY headboard if desired.
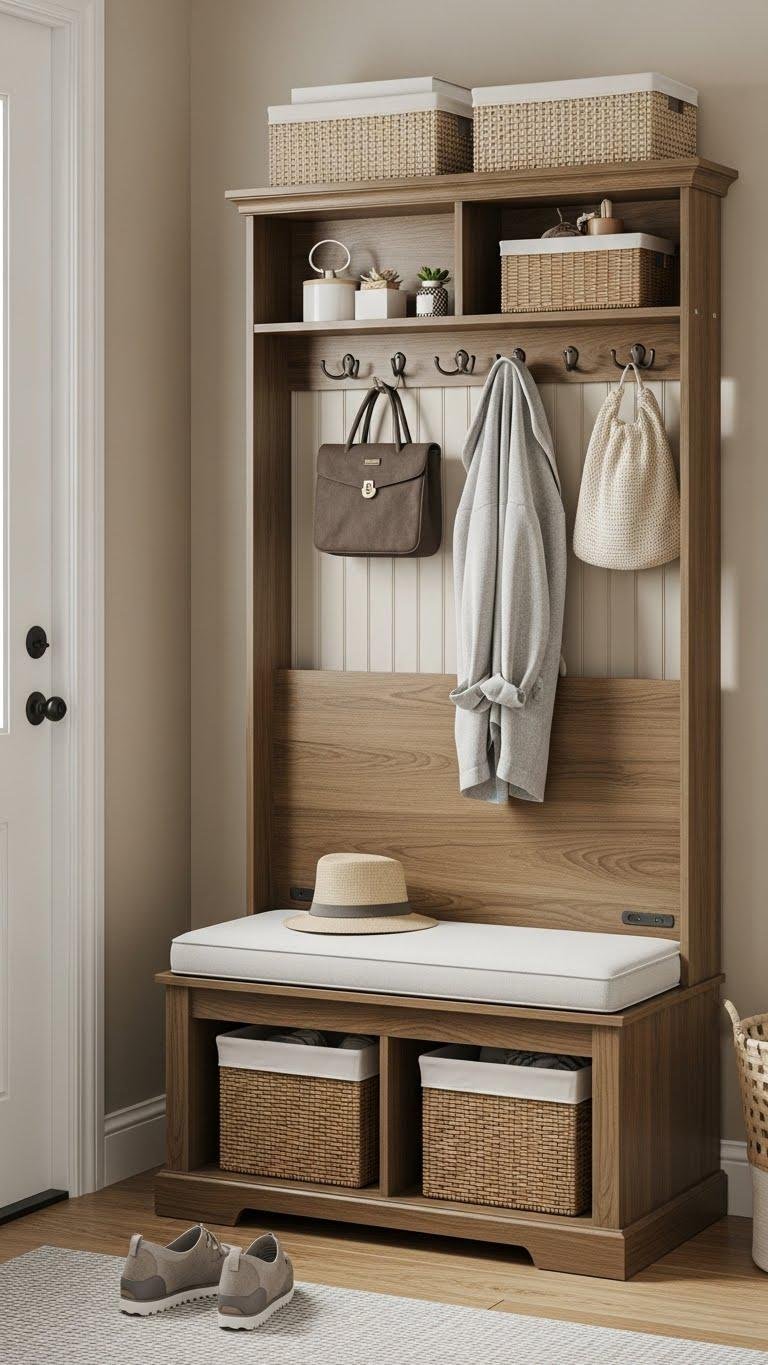
Craft a Wooden Entryway Bench
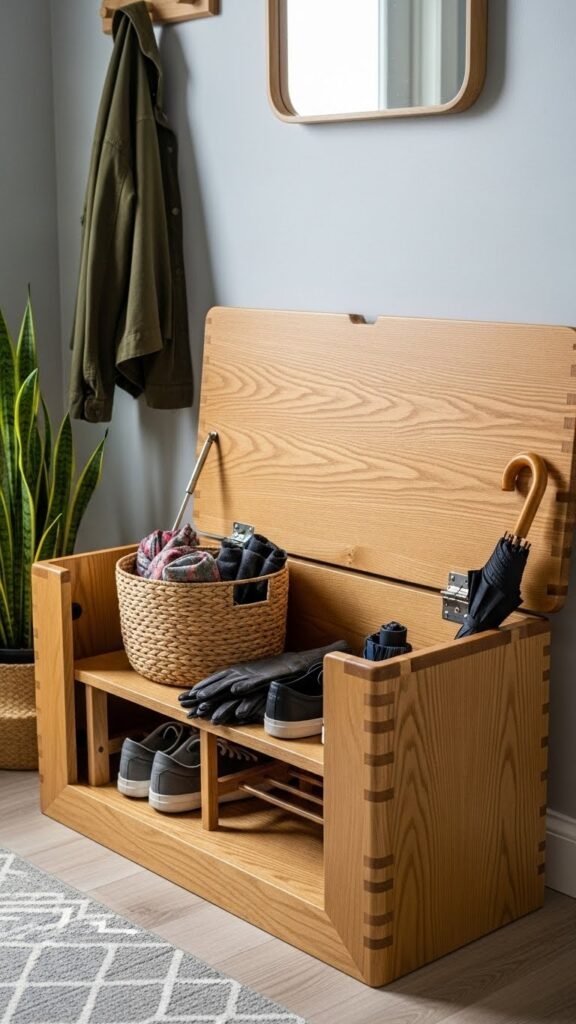
Measure your entryway and decide on length and seat height so the bench fits the space and serves your needs; a typical depth of 14–18 inches and seat height of 17–19 inches works for most people.
Choose sturdy wood, plan simple bench joinery like pocket screws or mortise-and-tenon, add hinged seat for entry storage, sand, finish, and install—so you get a durable, free-feeling piece.
Make a Modular Cube Storage Unit
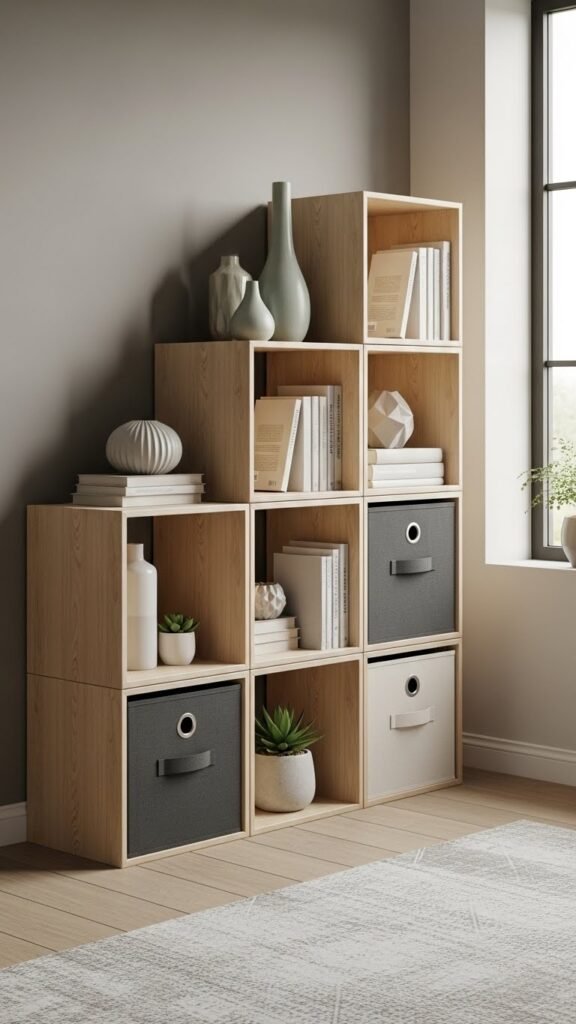
If you liked the bench’s blend of function and neat storage, a modular cube unit gives you similar utility on a larger scale: stackable cubes let you customize height, width, and arrangement to fit any wall or nook.
You’ll cut panels, use modular joinery for strength, and assemble cubes that lock together.
Focus on cube customization, finishing, and fasteners so you can reconfigure freely.
Build a Corner Desk for Small Spaces
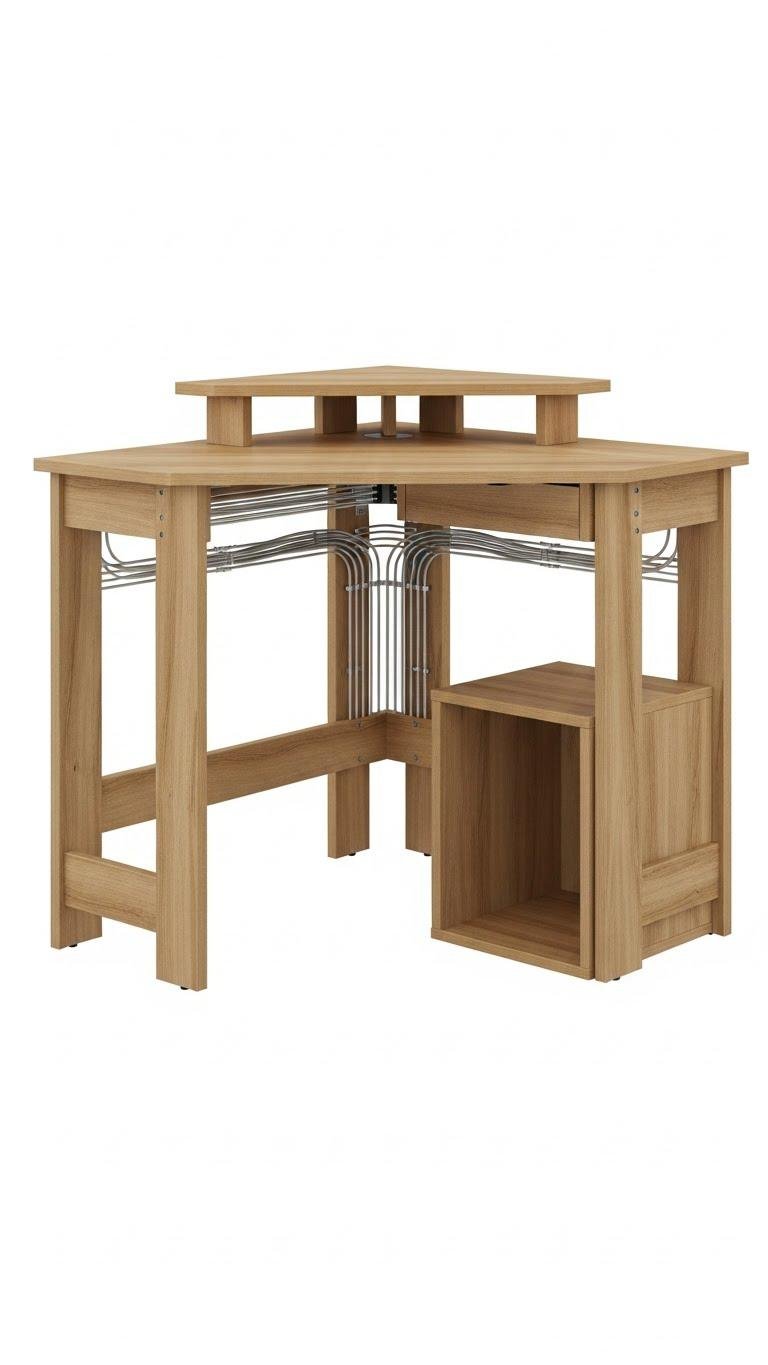
Maximize a tight corner by building a compact desk that gives you a full work surface without crowding the room; you’ll cut a shaped top to fit the corner, mount sturdy supports, and add storage options like a shallow drawer or open cubby depending on your needs.
Plan an ergonomic layout, secure legs, route Cable management under the top, and finish for freedom to rearrange.
Create a Wall-Mounted Fold-Down Table
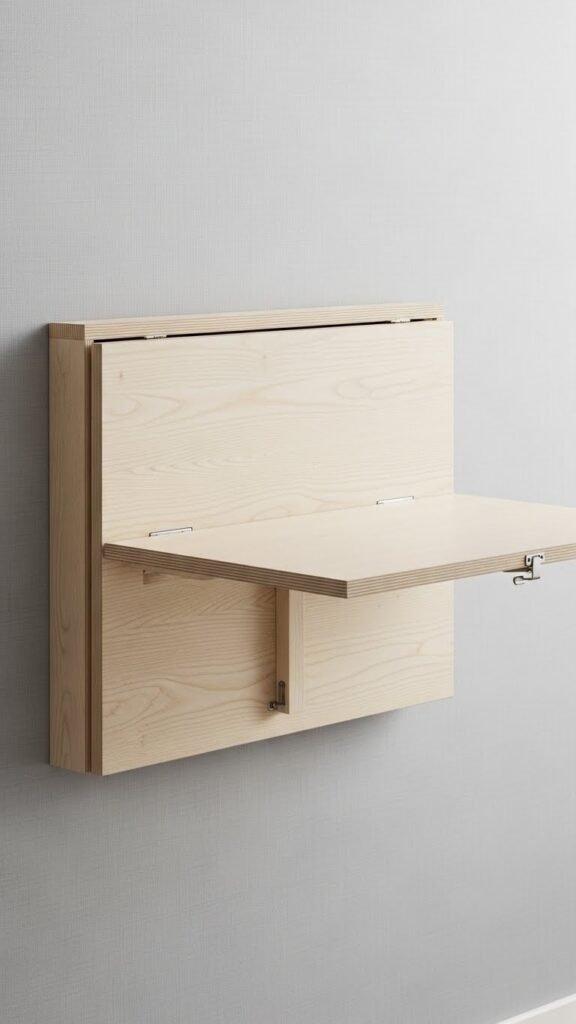
After fitting a corner desk, you might want an option that frees up floor space entirely: a wall-mounted fold-down table gives you a full work surface that tucks away when you don’t need it.
Mount a sturdy board on studs, install a space saving hinge, and add compact leg storage or removable legs.
Seal the surface; fold it down when freedom calls.
Construct a DIY Dining Table
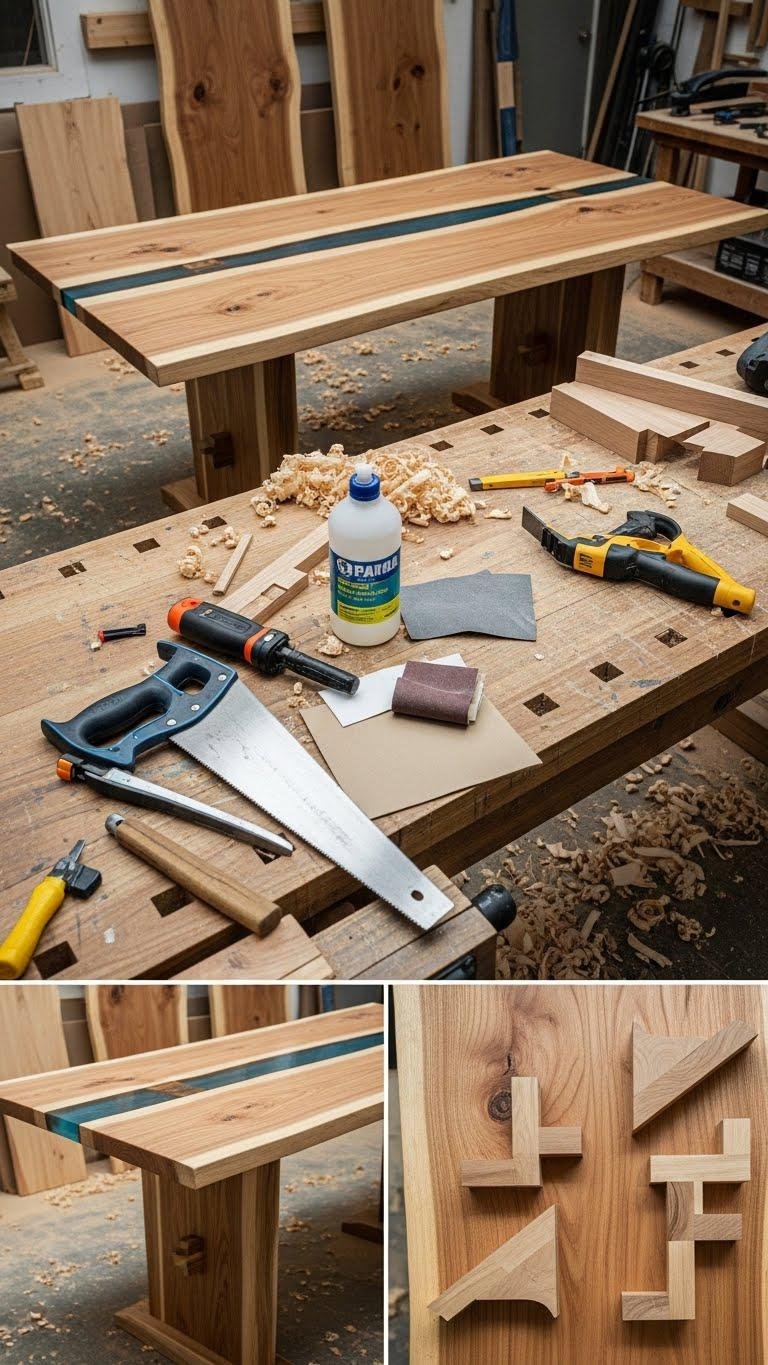
When you need a centerpiece that’s built to last, start by choosing a size and style that fit your space and skill level—you’re deciding between a simple farmhouse top with sturdy apron and legs or a more advanced breadboard end or mitred-edge design.
Pick solid wood or live edge slabs, plan joinery, route edges, sand, then seal with epoxy resin for durable, free-spirited dining.
Build a Mid-Century Style Nightstand
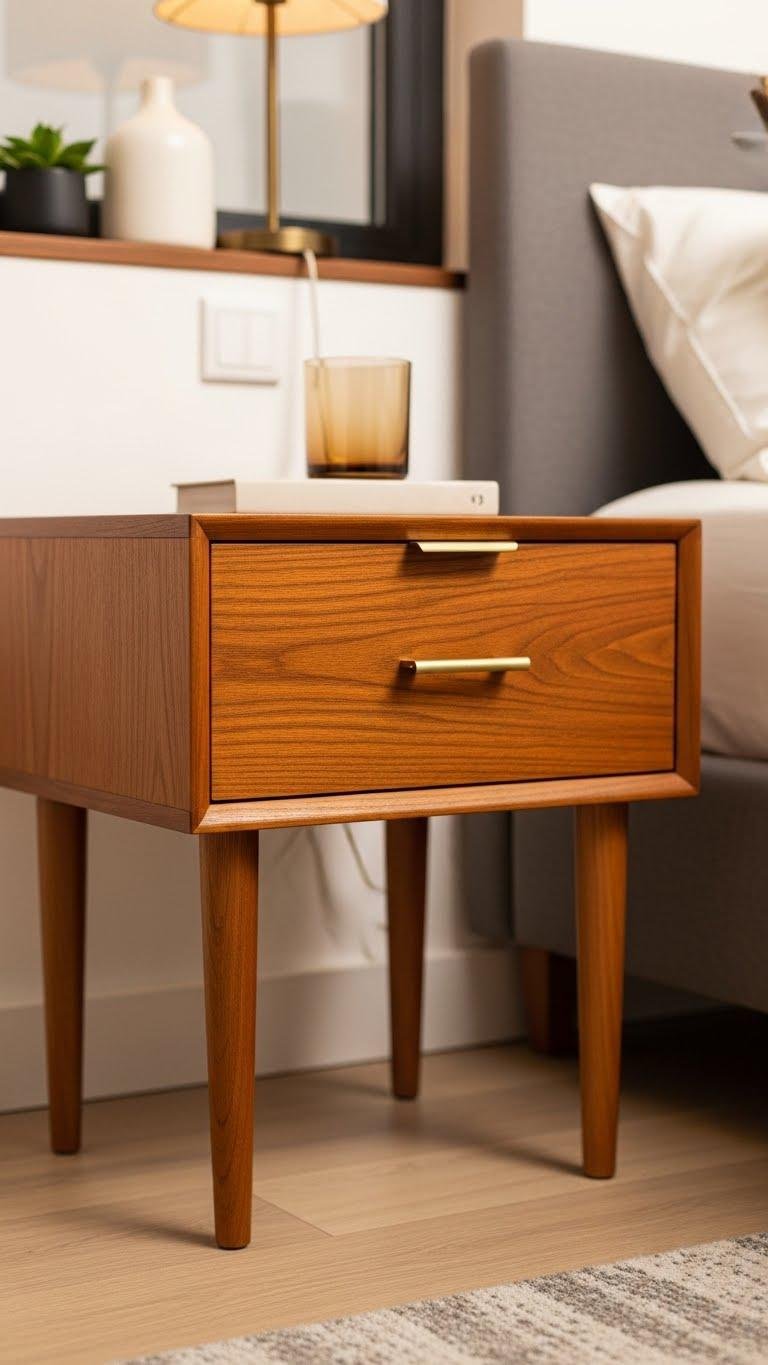
If your dining table project sharpened your joinery and finishing skills, you can apply those techniques to a compact mid-century nightstand that’s quicker to build but still characterful.
Cut a simple carcass, face with teak veneer for warmth, fit tapered legs, and add a single drawer. Choose slim brass hardware and satin finish. Sand, seal, and enjoy a sleek, liberated bedside piece.
Make a Reclaimed Wood Console Table

Gather reclaimed boards, basic tools, and a solid plan, and you’ll turn salvaged wood into a sturdy, characterful console table that fits an entryway or living room.
Choose a live edge slab or plank tops, sand selectively to preserve a weathered finish, square legs, join with pocket screws or biscuits, clamp, finish with oil or wax, and mount hardware for a personal, free design.
Assemble a Flat-Pack Style Bookshelf
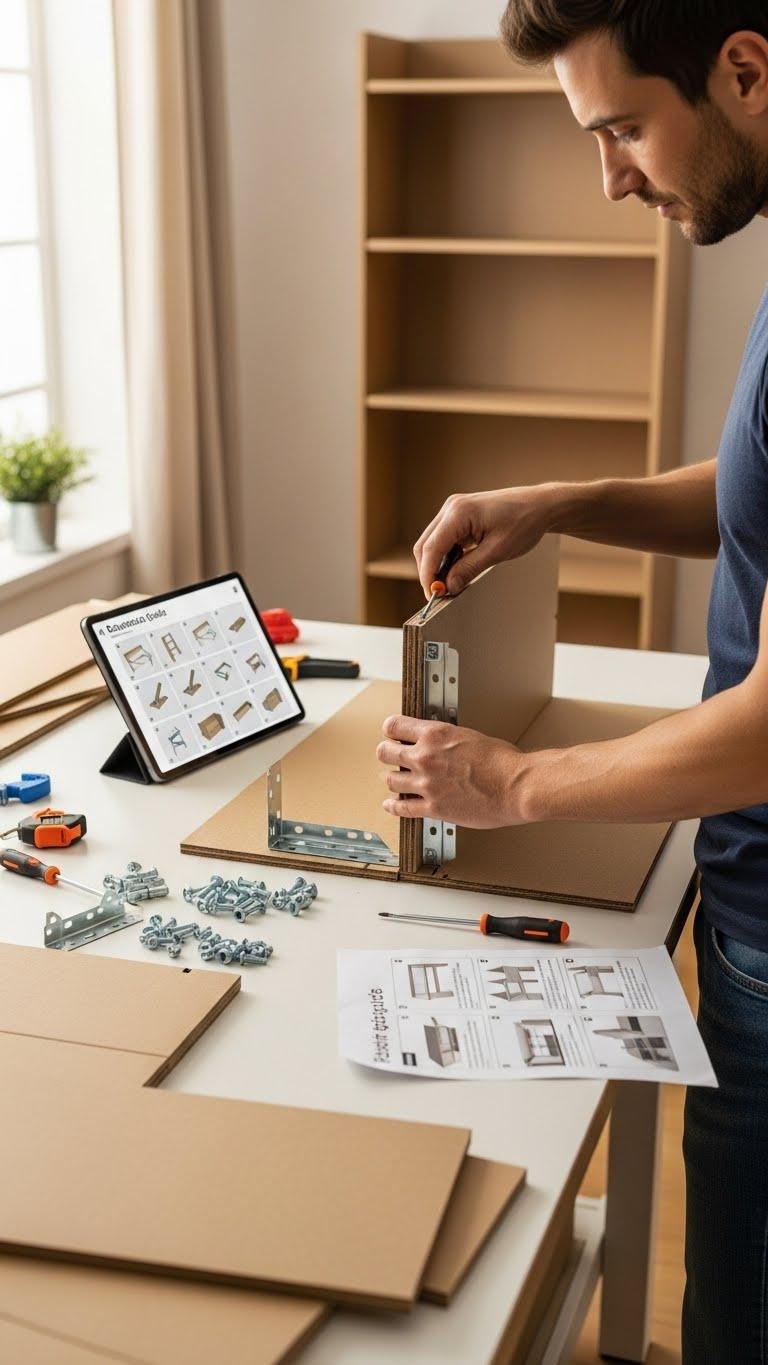
Paragraphs
Because flat-pack pieces are designed to go together quickly, you’ll save time by laying out all panels, hardware, and fasteners before you start, then following the manufacturer’s sequence step by step. Work with simple hardware, tighten fittings snugly but not over‑torqued, and add corner reinforcement where load concentrates. Level shelves, secure backing, and enjoy a sturdy bookshelf you built yourself.
Create a Planter Bench for Outdoor Use

When you set out to build a planter bench for outdoor use, start by choosing rot-resistant materials like cedar or pressure-treated lumber and sketching a simple plan that combines seating and planting space. Cut boards to size, assemble a sturdy frame, add waterproof liners and a smart drainage design, and create succulent seating pockets. Finish with oil or stain for weatherproof freedom.
Build a Storage Ottoman With Hinged Top

Start by choosing a sturdy frame material—plywood or kiln-dried hardwood work well—and decide on dimensions that fit your space and storage needs; you’ll want a depth of at least 12–16 inches to store blankets or magazines comfortably. Build a box with a vented base, attach piano hinges for the lid, add foam and apply basic upholstery techniques, then finish with fabric and feet for freedom to move.
Make a Ladder-Style Towel or Blanket Rack

A ladder-style towel or blanket rack gives you vertical storage without taking up floor space and you can build one in an afternoon with basic tools and a few lengths of hardwood or plywood.
Choose a space saving design: set rung spacing for towels or throws, angle legs for stability, sand and try wood finish options, seal with clear coat, mount or lean where you want freedom and function.
Construct a Simple Kids’ Play Table and Chairs
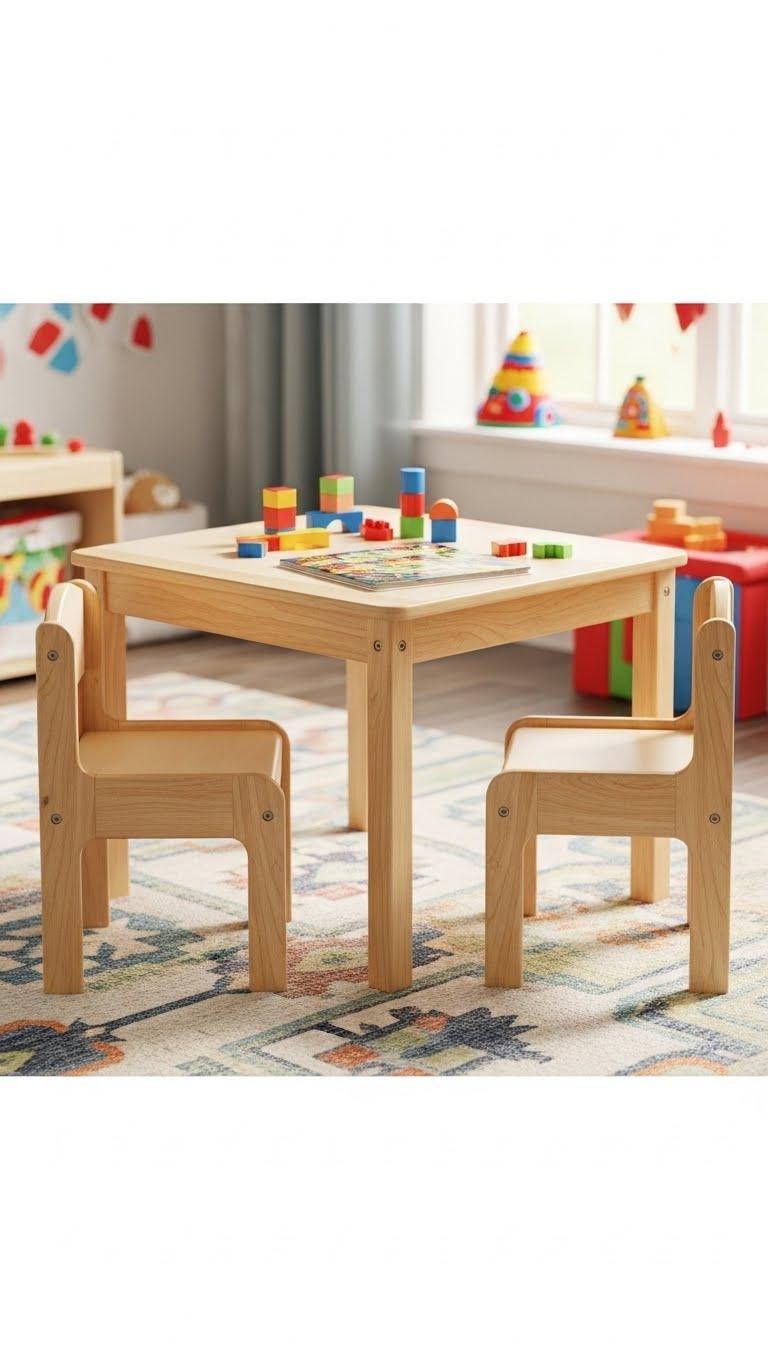
After you finish sanding and sealing the ladder rack, turn your attention to a compact kids’ play table and chairs that you can build with the same basic tools and small offcuts of hardwood or plywood. Cut simple legs and a top, sand edges, use child safe finishes, and screw pieces for strength. Aim for a lightweight, portable design so you can move it anywhere your kids play.
Build a Shoe Storage Bench With Cubbies

Build a sturdy shoe storage bench with cubbies to keep entryways tidy and give you a convenient place to sit when you put on shoes.
Measure your space, cut plywood for a sturdy frame, and assemble cubbies sized for your footwear.
Add a cushioned top for entry seating and finish with stain or paint.
This DIY saves money and improves shoe organization.
Create a Floating Media Console
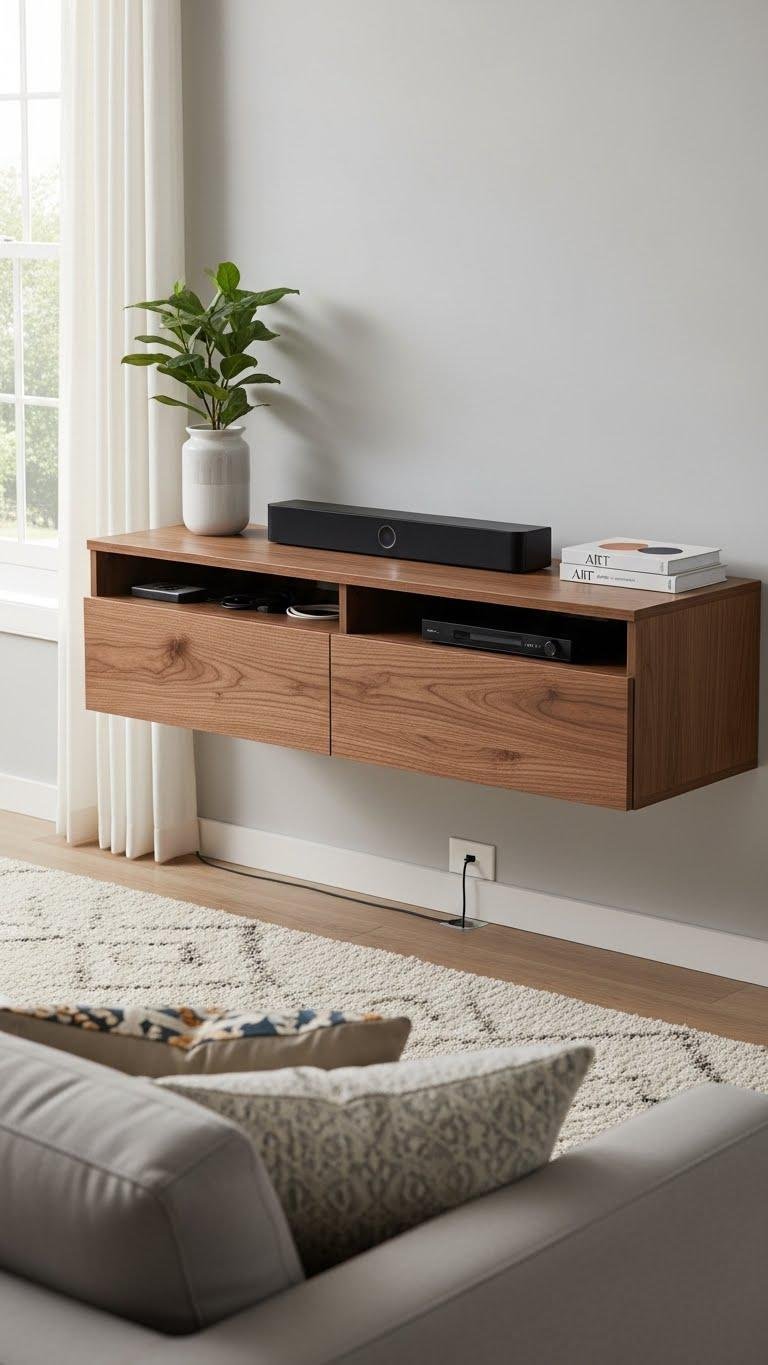
If you want a sleek, space-saving upgrade, create a floating media console that hides cords and keeps electronics off the floor. Plan dimensions, mount a sturdy cleat, and route cable management channels for a clean look.
Choose strong anchors, assemble shelves, then perform weight testing before loading gear. You’ll gain freedom from clutter and an organized, modern focal point.
Make an Industrial Pipe Clothing Rack
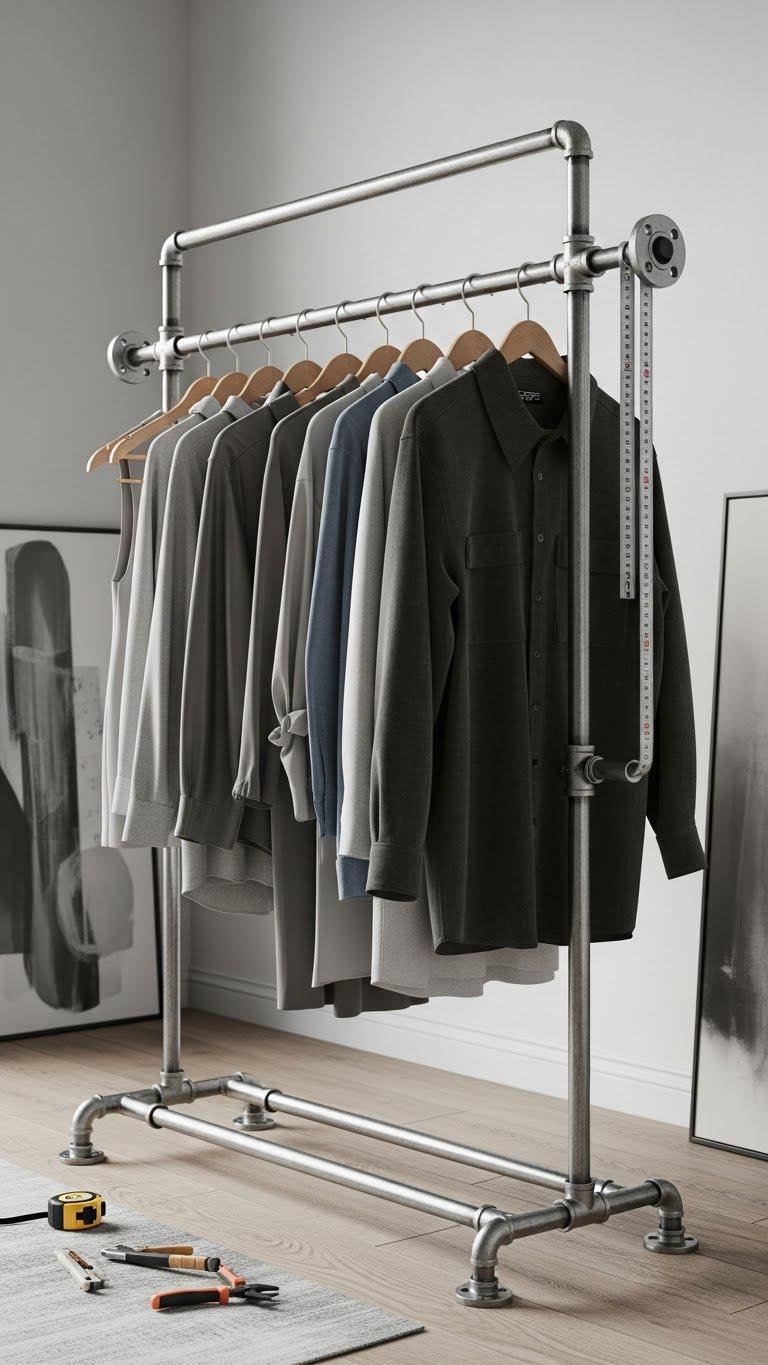
When you want a sturdy, stylish clothes display that fits an industrial or minimalist space, an industrial pipe rack gives you a durable, customizable solution you can assemble with basic tools and hardware.
Measure your space, pick pipe sizes, flanges, and fittings, cut and thread where needed, anchor securely, then finish with matte paint.
Your pipe clothing rack becomes an efficient industrial garment stand.
Build a DIY Murphy Bed for Guest Rooms
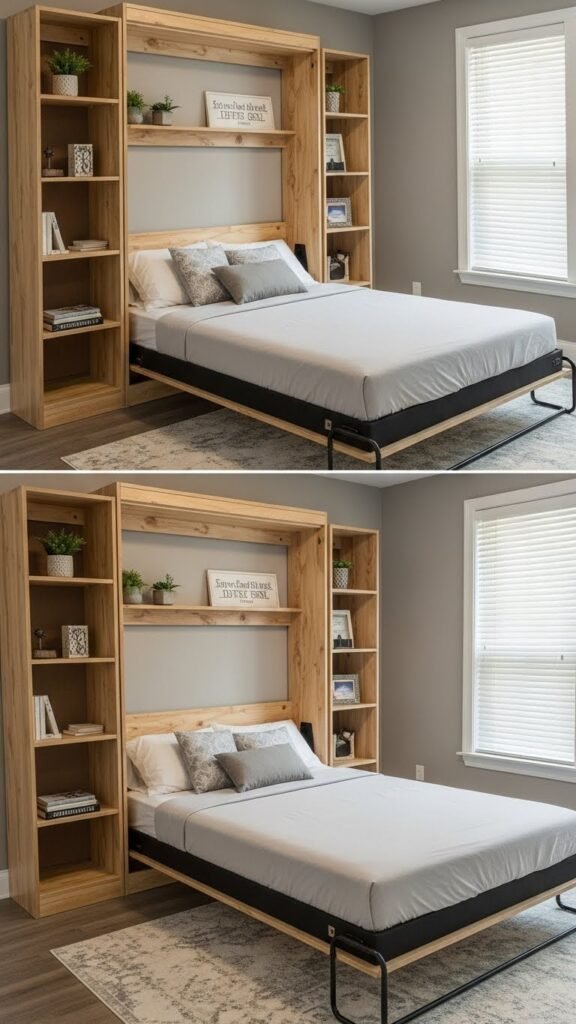
After making an industrial pipe rack, you might want a different space-saving solution for guests: a Murphy bed gives you full-size sleeping comfort that folds away during the day.
Plan sturdy frames, select reliable space saving mechanisms, and anchor to studs.
Choose finishes that allow decor integration with shelves or a desk.
Install gas pistons carefully; test balance and clearance before first use.
Assemble a Rustic Potting Bench

Gather your materials and clear a workspace so you can assemble a sturdy rustic potting bench that’s comfortable to use and easy to maintain.
Cut and sand reclaimed wood, fasten a lower shelf for soil and tools, and add hooks for trowels.
Seal with weatherproof finishes.
Position for sunlight, plan herb selection and drainage, and anchor the bench so it stays steady while you pot.
Make a Repurposed Drawer Coffee Table
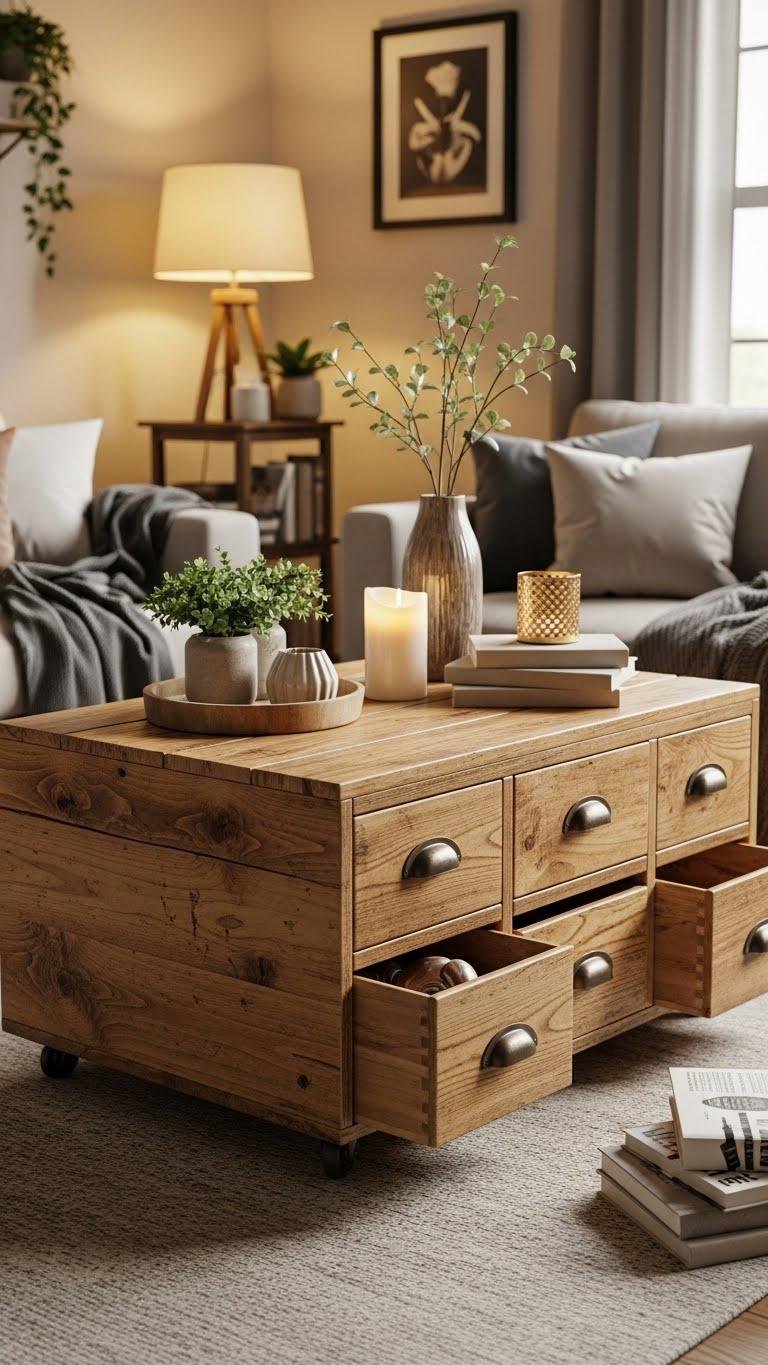
If you enjoyed giving old wood new life with that potting bench, you can repurpose discarded drawers into a functional coffee table that adds character and storage to your living room. Strip paint, sand, and seal during drawer restoration. Stack or join drawers, add cleats for strength, attach legs, and reuse vintage hardware for pulls. Finish with wax or oil for a free-spirited, durable centerpiece.
Build a Narrow Hallway Console With Drawers

Make the most of a tight entryway by building a narrow hallway console with drawers that gives you storage without crowding the space.
Choose dimensions that keep traffic clear, use plywood or reclaimed wood, and fit smooth drawer glides for reliable access.
Build shallow drawers for keys and mail, anchor the console to the wall, and finish with stain or paint to match your freedom-focused décor.
Create a Multi-Purpose Bench With Hidden Storage
After fitting a slim console in your entryway, you can free up even more floor and surface space by building a multi-purpose bench with hidden storage that serves as seating, a drop zone, and extra organization. Measure the space, build a sturdy box with lift-top storage compartments, add simple bench upholstery for comfort, and finish with hooks and baskets so you’ll grab essentials and move freely.