
You can tackle a lot of nagging house problems yourself with a few basic tools and tricks, and you’ll save time and money while making your space feel better. From stopping a leaky faucet to freshening a dishwasher, these 21 hacks are practical, visual, and doable even if you’re not handy. I’ll show simple steps, common pitfalls, and what supplies to keep on hand so you can fix things faster—and smarter.
Fix a Leaky Faucet Washer or Cartridge

Drip, drip—don’t ignore it; a leaky faucet wastes water and gets annoying fast. You’ll do a quick drip diagnosis: shut water, remove handle, inspect washer or cartridge for wear or debris. Swap parts, seat them square, test flow.
If you feel banging, check for water hammer fixes too. You’ll reclaim quiet, cut waste, and keep control of your home.
Unclog a Toilet Without a Plumber
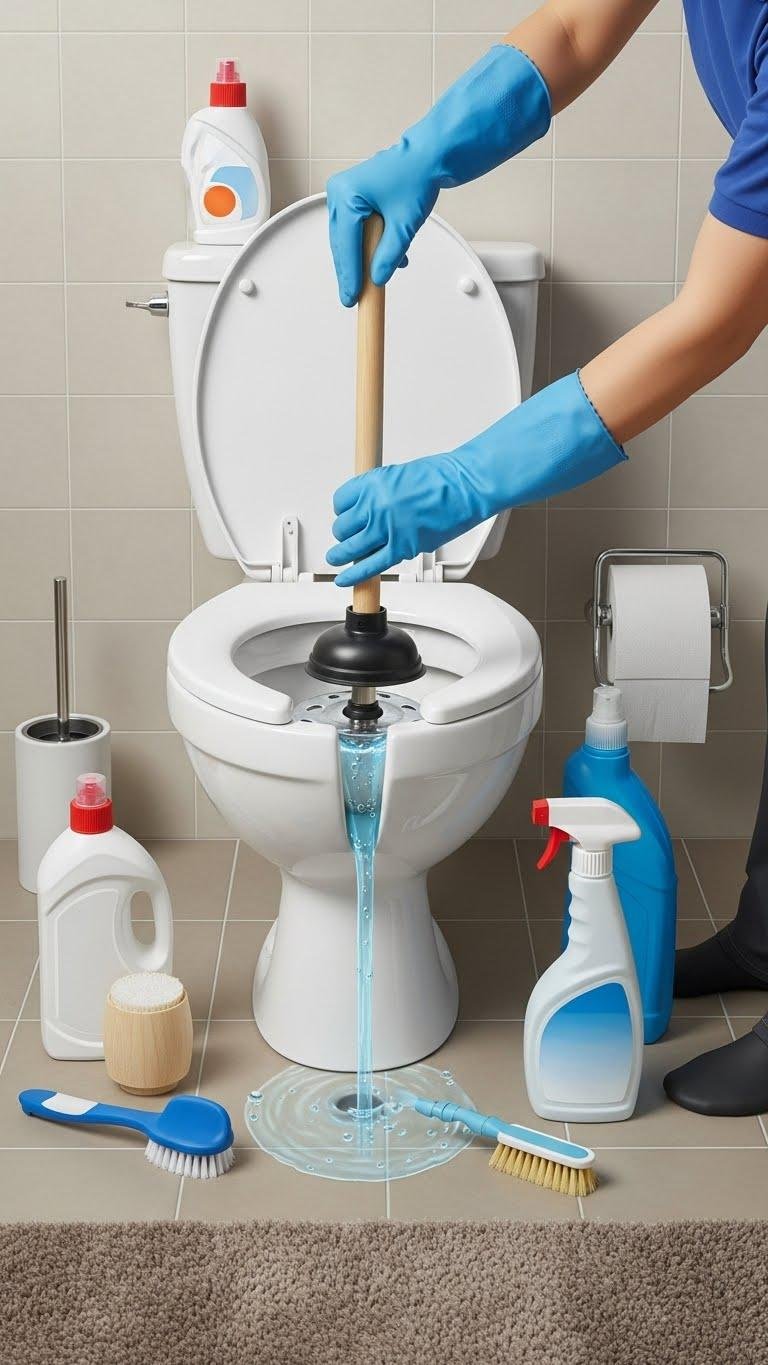
When a toilet backs up, don’t panic—move quickly with a plan you can handle yourself. Grab a flange plunger, position firmly, and pump with steady pressure using a reliable plunger technique.
If water’s slow but moving, add enzyme treatments overnight to digest organic buildup. Wear gloves, bail excess water, and repeat. You’ll regain control without calling a plumber, fast and free.
Unjam and Refresh a Garbage Disposal

Give your sink a quick reset before you call for help: turn off the power, clear visible debris, and use an Allen key or a wooden spoon to manually spin the disposal’s flywheel from under the unit to free a jam.
Hit the manual reset button, run cold water, and grind ice cubes plus citrus peels. Finish with odor neutralizers to keep freedom-smelling results.
Clean and Deodorize Kitchen Sink Components
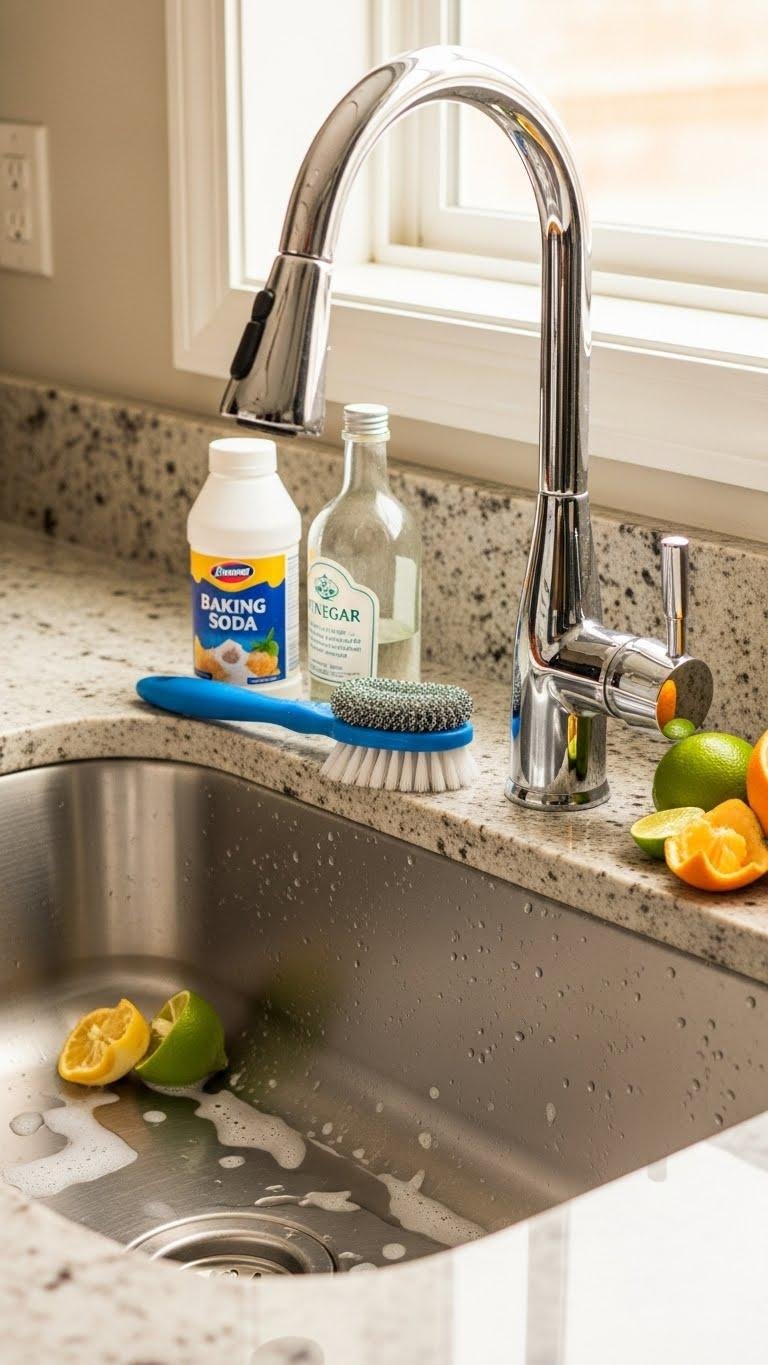
Once the disposal’s humming again, don’t forget the rest of the sink often holds the smells and gunk that sent you under the cabinet in the first place. Scrub the stopper, strainer, and faucet base with baking soda and vinegar to fight bacterial buildup.
Rinse, dry, and polish to restore stainless shine. Let citrus peels air-dry in the disposal for fresh confidence.
Reseal Bathtub and Shower Caulking
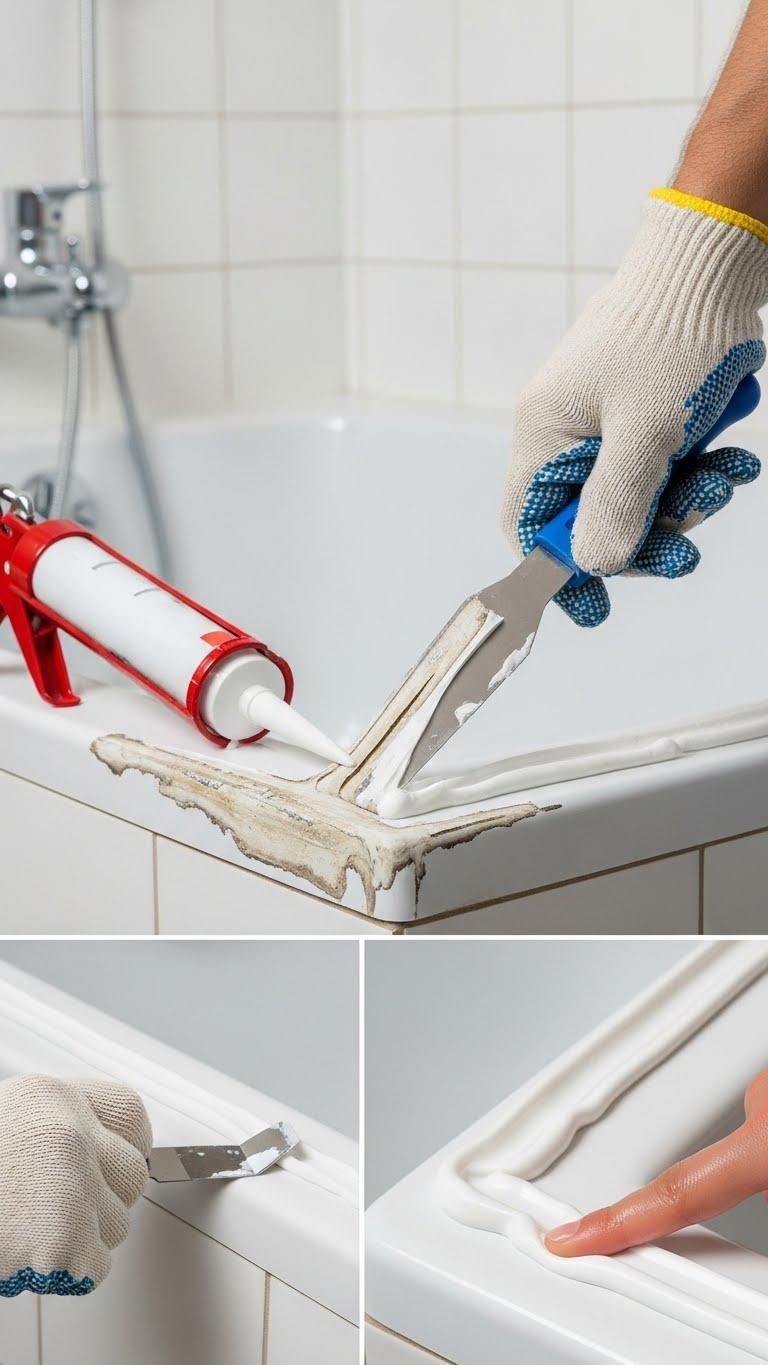
Ready to tackle caulking? You’ll clear old caulk, dry the joint, and pick silicone selection that’s mildew-resistant.
Cut the tube tip, steady your wrist, and run a smooth bead. Tool it with a wet finger or spatula for a clean finish. Let it cure fully to make certain mold prevention and enjoy a watertight, carefree shower space.
Patch Small Drywall Holes
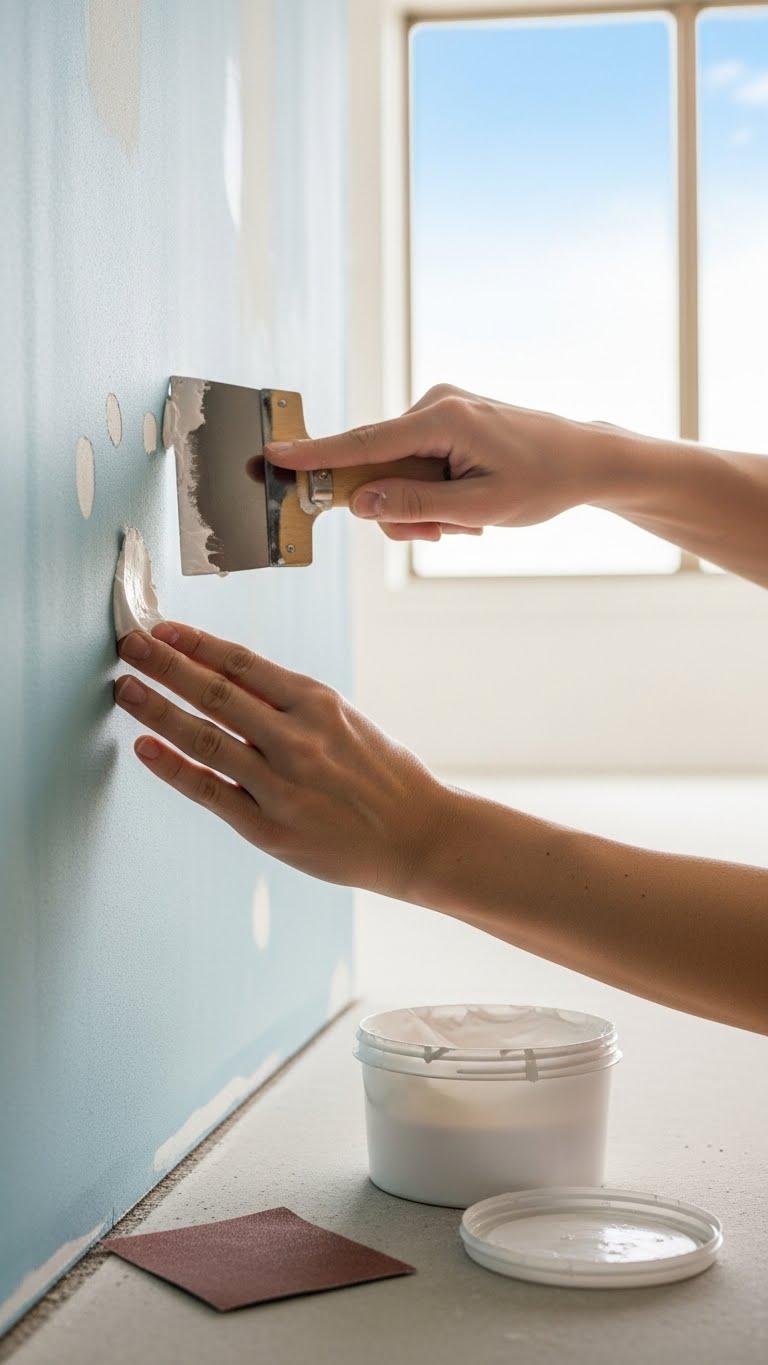
Grab a putty knife and a small tub of spackle—you’ll be surprised how fast you can fix nail holes and dents.
Press spackle in, smooth with the knife, let dry.
Sand lightly with fine grit until flush, feather edges for seamless texture matching.
Prime, paint, and step back — you’ll reclaim your wall’s clean look and keep your space feeling open and under your control.
Remove Drywall Dents With Moisture and Heat
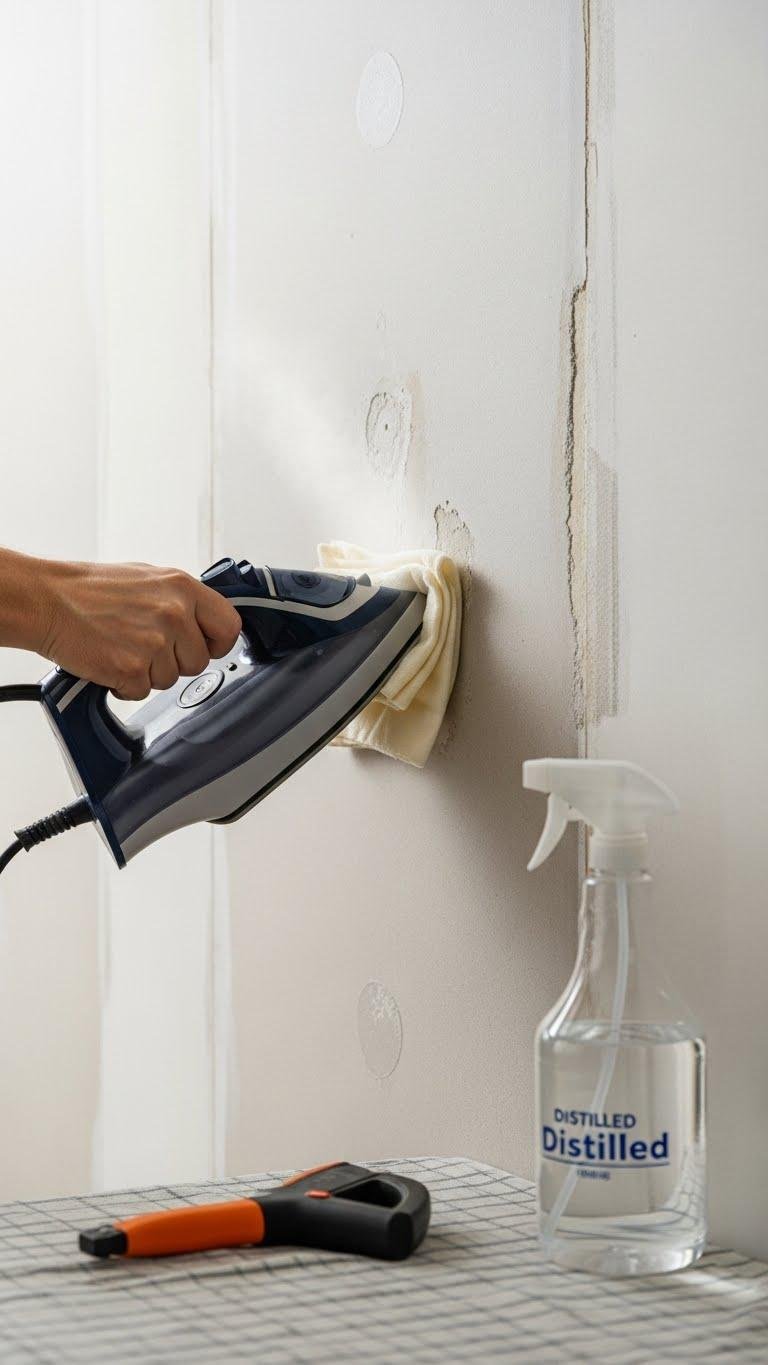
If a shallow dent’s left your wall looking dingy, you can coax the paper and gypsum back into shape with steam and a little patience. Fill a spray bottle with distilled water, wet the dent, then apply steam technique using a clothes iron over a damp cloth.
Let dry, sand gently, touch up with paint blending so the repair disappears and you regain control of your space.
Repair Grout and Replace Old Caulk Around Tiles
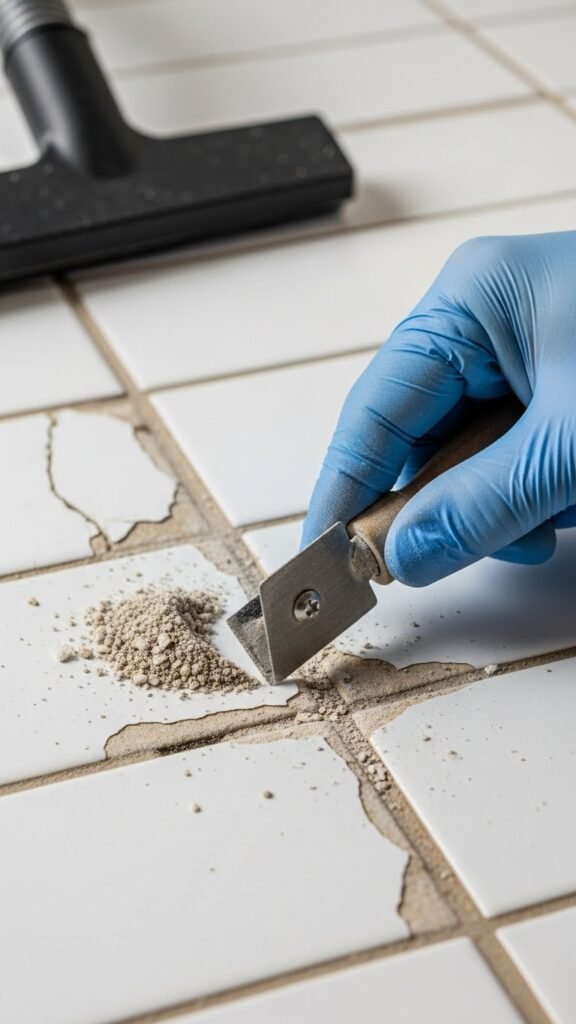
Start by inspecting the grout lines and caulk seams to spot cracks, gaps, or mold so you know exactly what needs attention. Scrape damaged grout, vacuum debris, and apply epoxy grout for durability.
Let it cure, then smooth joints. Remove old caulk, dry surface, and recaulk with silicone. Finish with grout sealing to protect lines—clean, simple, and freeing upkeep.
Remove Ceiling Water Stains Safely
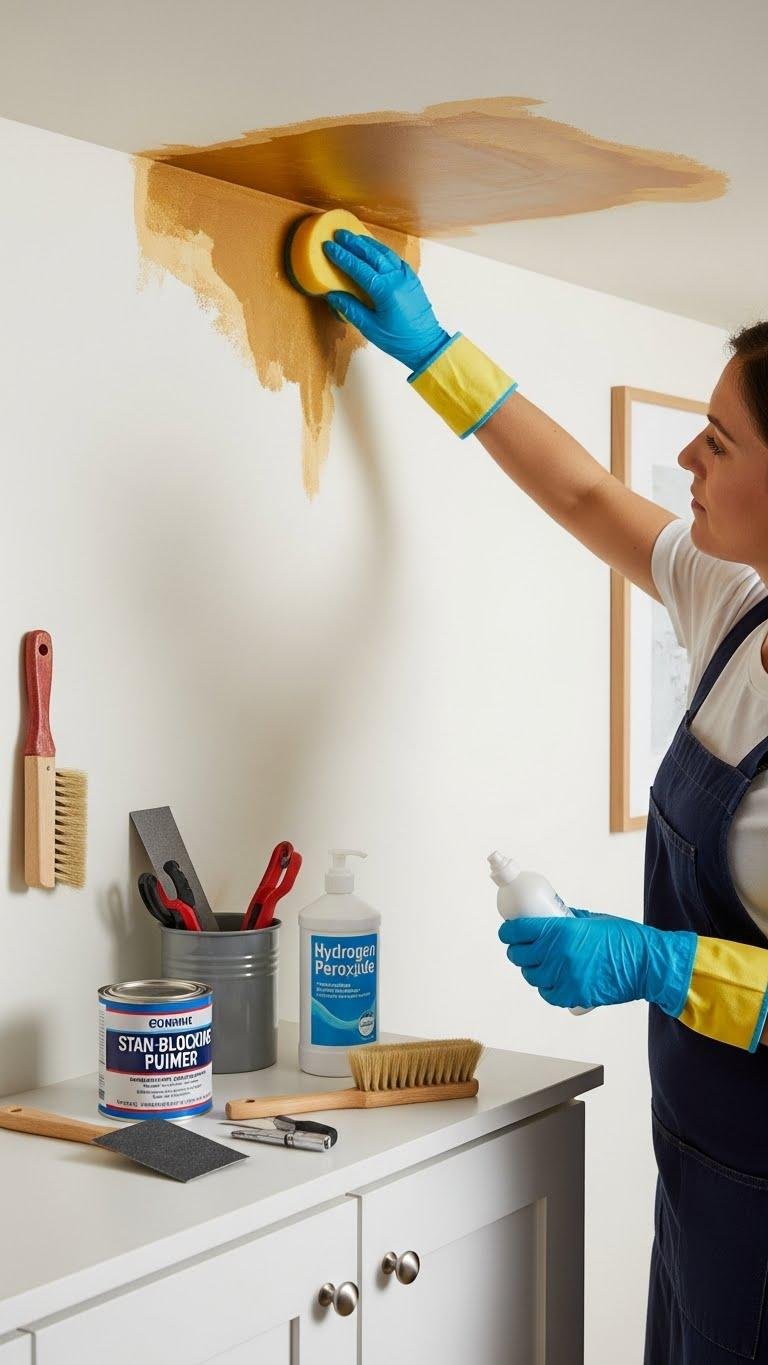
When you spot a brown or yellow ring spreading across your ceiling, don’t panic — you can tackle it safely and efficiently with the right checks and supplies.
Confirm the leak’s fixed, blot dry, then apply hydrogen peroxide to kill stains. Sand lightly, clean, and use a stain-blocking ceiling primer before repainting. You’ll regain calm, control, and a clean ceiling.
Touch up Appliances With Appropriate Spray Paint
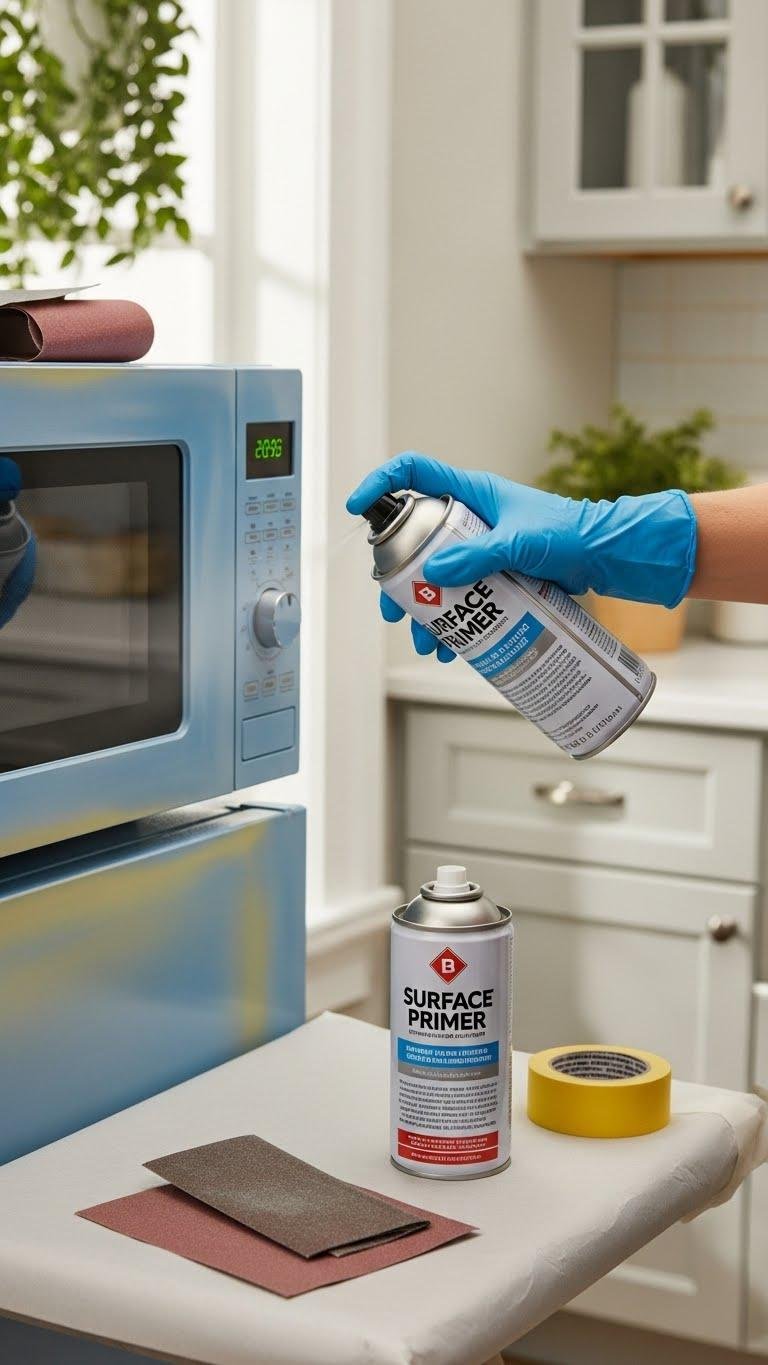
Give your appliance a fresh look by using the right spray paint and a steady hand. You’ll sand, clean, and apply surface primer to guarantee adhesion.
Tape edges, work in thin, even coats, and watch for runs. Pick a finish that suits your space; color matching keeps things cohesive.
You’ll reclaim control over your home’s style without hiring anyone.
Install Weatherstripping on Doors and Windows
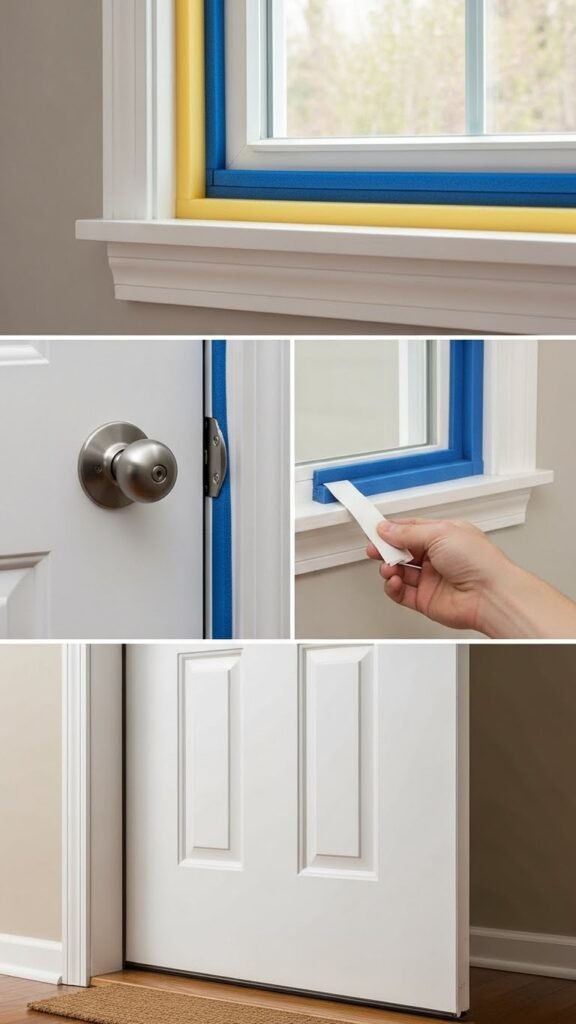
After freshening up an appliance, you can keep that upgraded look (and your energy bills) by sealing drafts around doors and windows with weatherstripping.
You’ll run foam or V-strip along frames, apply adhesive draft sealant to tight gaps, and fit a threshold sweep under exterior doors.
It’s quick, visual, and empowering — you’ll cut drafts, save money, and reclaim comfort without hiring anyone.
Use Foam Pads Behind Outlets to Reduce Drafts
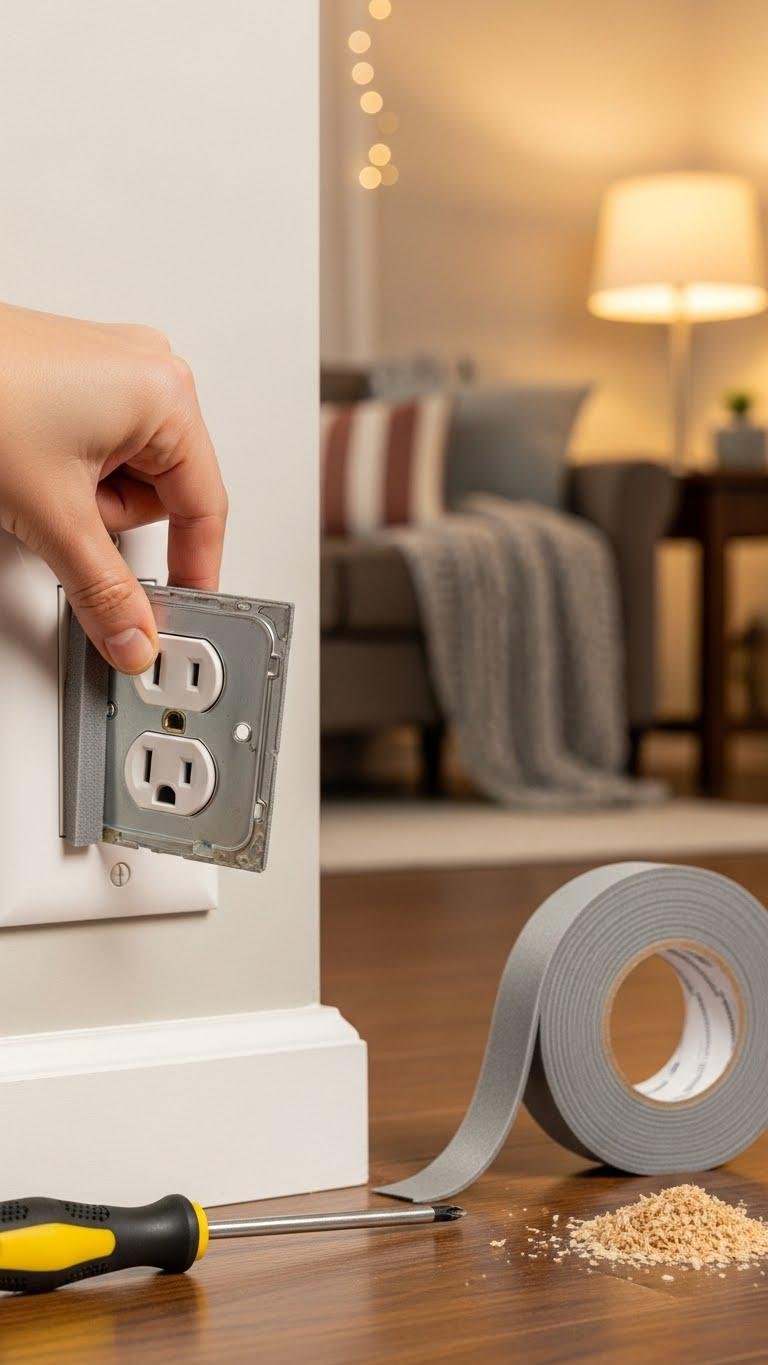
Often overlooked, outlet and switch openings behind faceplates are easy paths for cold air — and you can stop them with simple foam pads.
You pop off the plate, press foam gaskets into the box, and replace the cover — outlet insulation done.
It’s quick, cheap, and clean-looking, letting you keep control of your comfort without calling a pro or sacrificing style.
Block Door Drafts Temporarily With Simple Solutions

When cold air sneaks under your door, you don’t need fancy tools to block it — a few simple, temporary fixes can make a noticeable difference fast.
Roll a towel or buy a fabric draft stopper to press against the gap, use removable weatherstripping for quick sealing, and add window film on nearby panes to reduce chill. These moves keep your space freer, warmer, and under your control.
Replace HVAC Air Filters Regularly
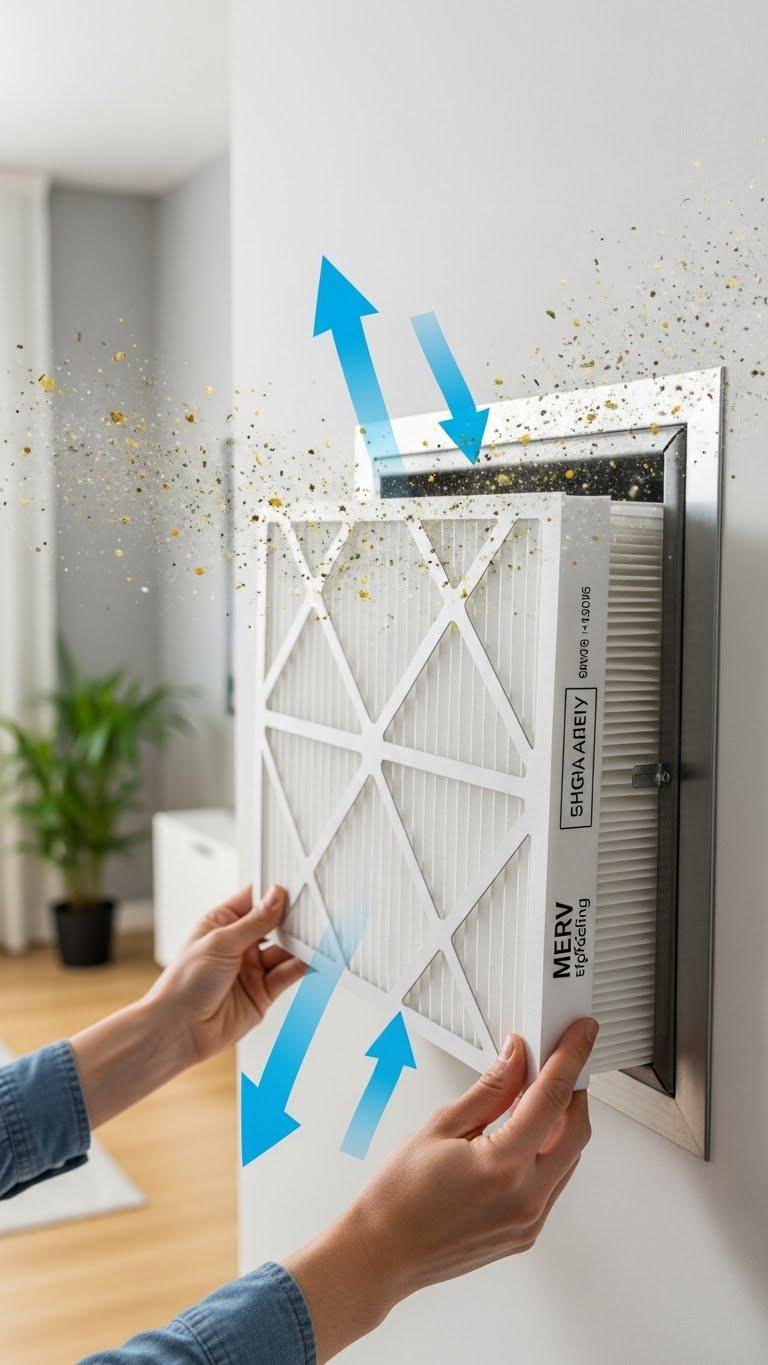
Regularly swapping your HVAC air filter is one of the simplest ways to keep your system running smoothly and your home air cleaner.
You’ll slide in a fresh filter every 1–3 months, picturing dust and pollen trapped instead of swirling.
That simple habit boosts allergen reduction, improves airflow, and delivers real Energy savings — freeing you from costly repairs and tighter, fresher living.
Seal Cracks Around Window Frames and Exterior Doors
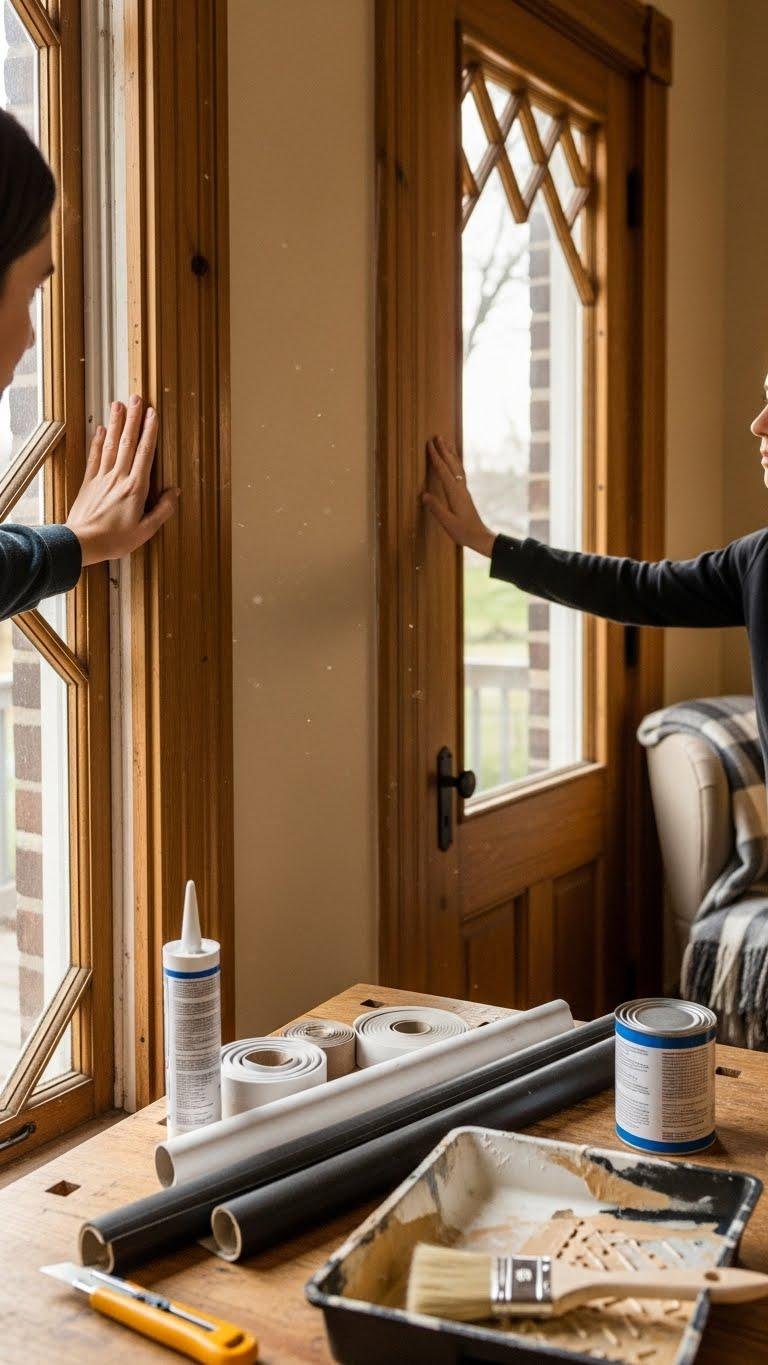
By running your hand along window frames and door edges, you can feel where cold air sneaks in and energy slips out — those tiny gaps are easy to fix and make a big difference.
Grab caulk or weatherstripping, press it firmly, smooth seams, and paint if needed.
These weatherproofing tips are quick seasonal maintenance that save money and give you more freedom at home.
Clean Exhaust Fans to Improve Airflow
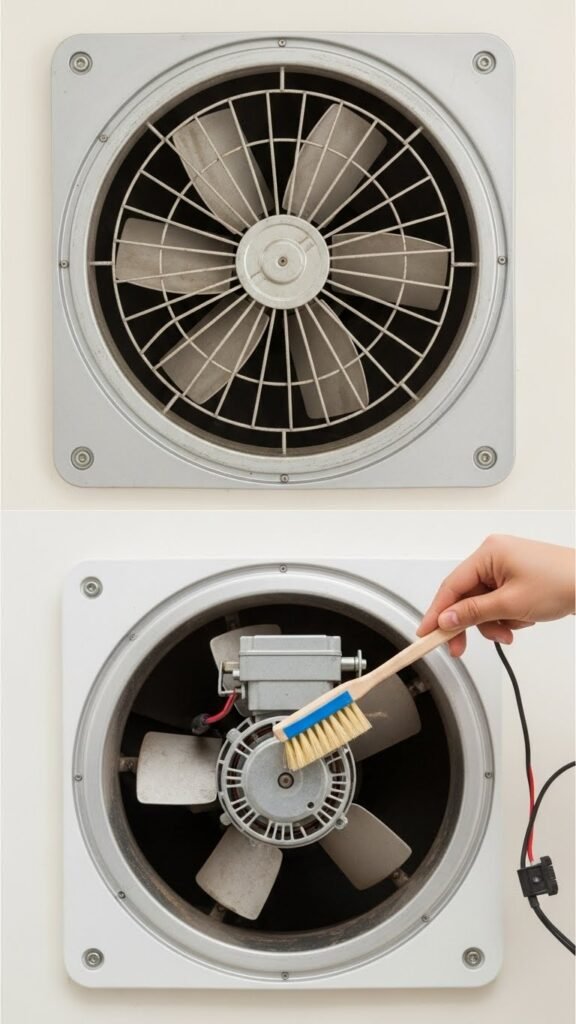
Often you’ll notice exhaust fans getting noisy or weak long before you see the dust — that’s your cue to clean them.
You’ll remove the cover, do a blade inspection, and wipe grime from blades and motor housing.
Use a soft brush and mild cleaner, spin blades by hand to check balance, then reassemble.
Cleaner fans move air freely and save energy.
Deep Clean Dishwashers and Garbage Disposals
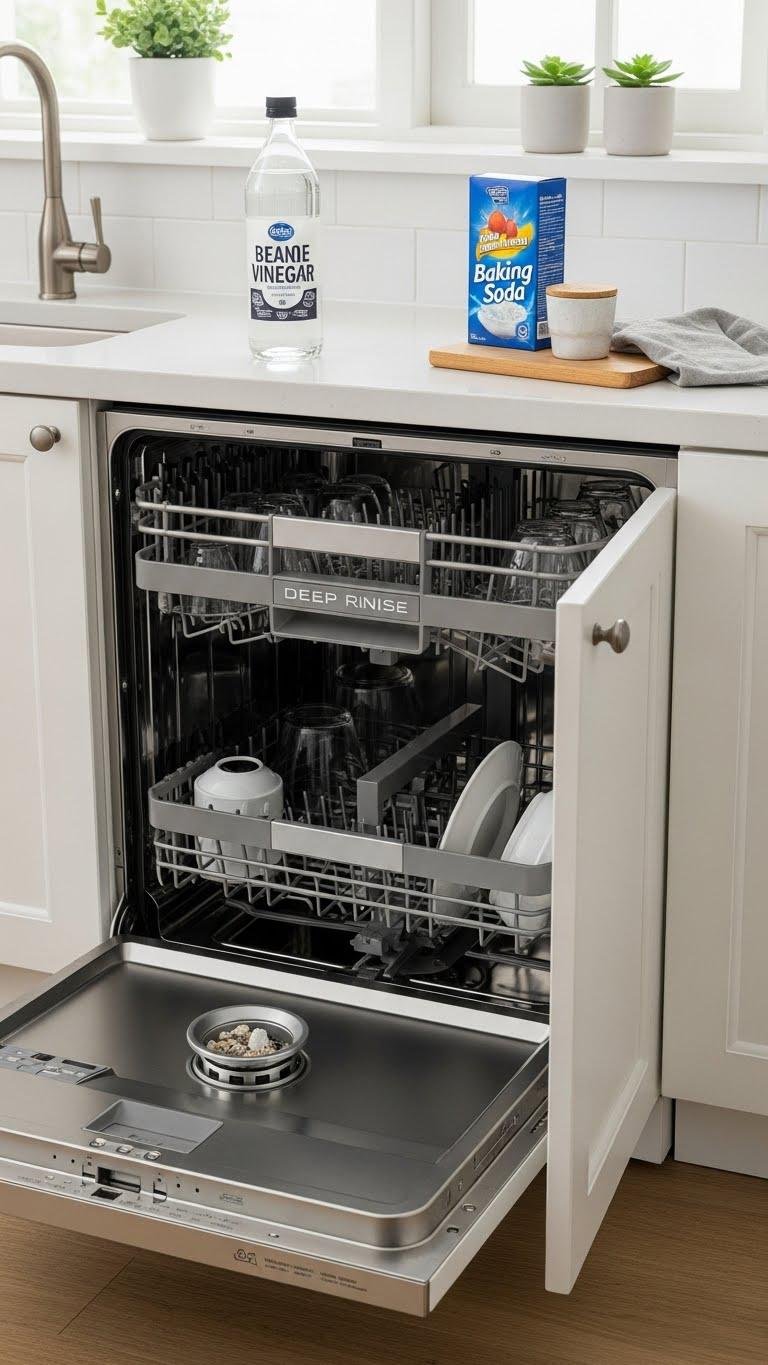
Once you’ve restored airflow by cleaning exhaust fans, shift attention to the appliances that handle your kitchen’s mess: dishwashers and garbage disposals.
Run a deep rinse cycle with vinegar and baking soda, scrub seals and spray arms, then clear the disposal trap.
Prioritize filter maintenance, remove debris, and test drains.
You’ll reclaim fresh smells and effortless cleanup, freeing your kitchen to work for you.
Clean Greasy Vent Hood Filters Quickly
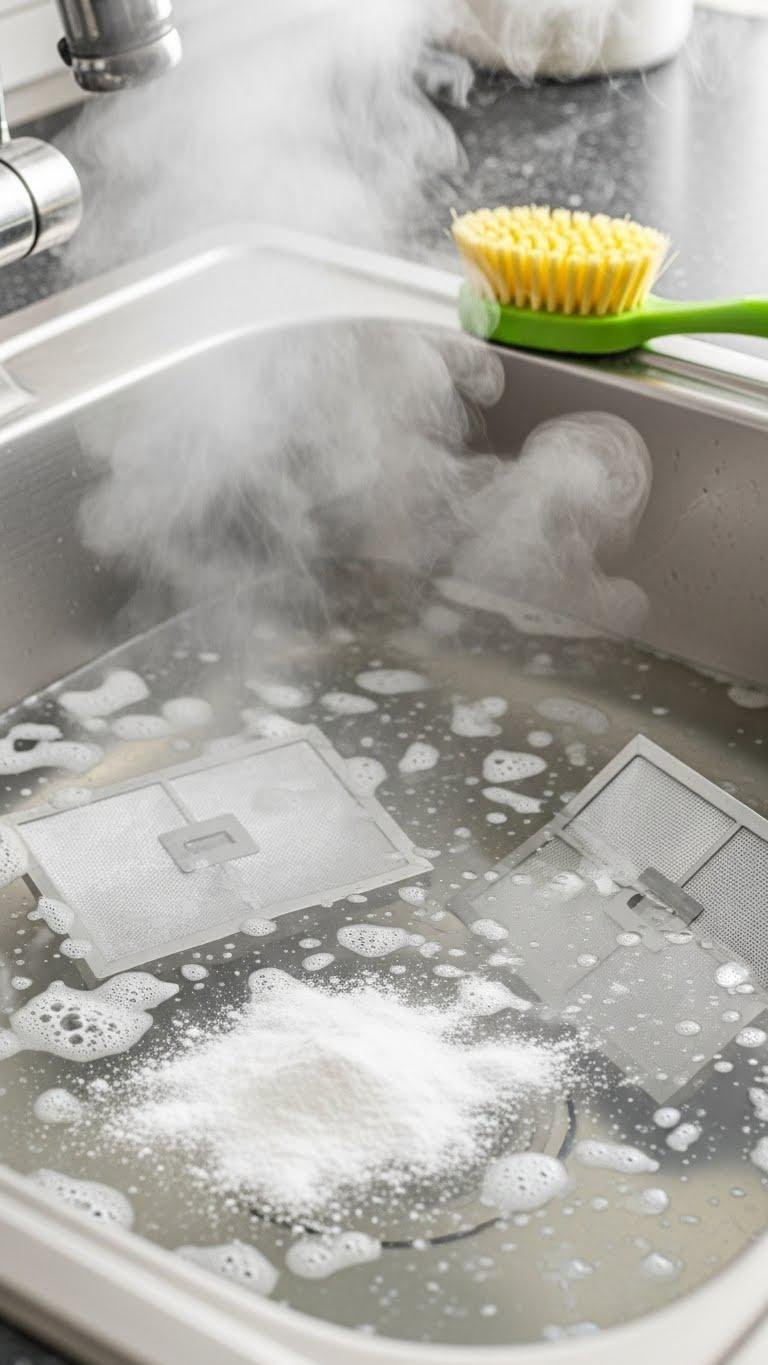
Grease builds up fast on vent hood filters, but you can cut through it quickly with the right technique. Fill a sink with hot water, add baking soda and a few drops of dish soap, then soak filters 15–20 minutes.
Scrub with a brush, rinse, or use steam cleaning for stuck grime. Dry fully before reinstalling to keep your kitchen free and functional.
Prevent Mirror Fog With a Simple Trick

You can stop your bathroom mirror from fogging with a tiny, hassle-free trick: rub a thin layer of shaving cream or a dab of dish soap over the glass, wipe it off so a faint film remains, and the surface will resist steam for several showers.
That film works like DIY anti fog coatings, creating a simple thermal barrier against condensation so you can move freely.
Update Kitchen Cabinet Hardware on a Budget
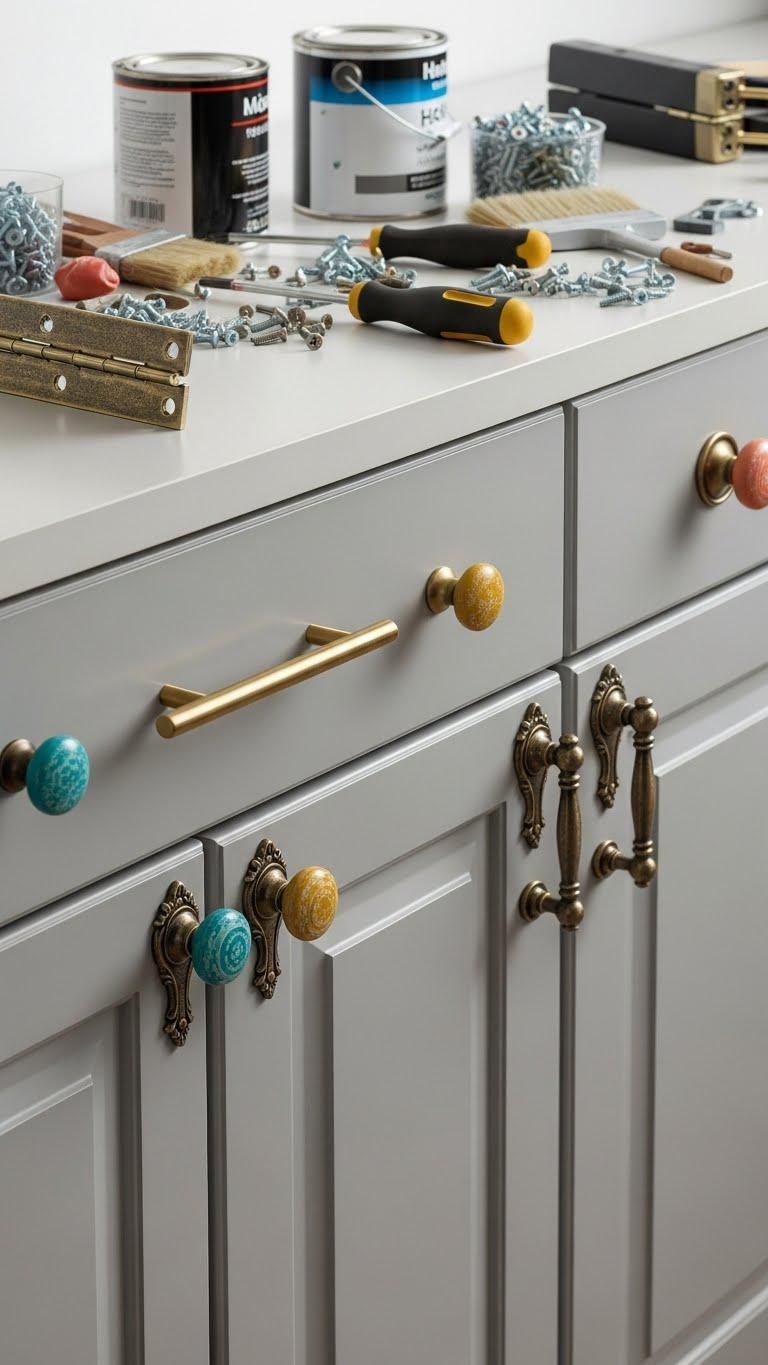
Give your cabinets a fresh look without blowing your budget by swapping out knobs and pulls — it’s one of the fastest, most visible upgrades you can do.
You can paint knobs for a pop of color, refinish hinges for a cohesive finish, and mix vintage pulls with modern ones.
Work room by room, keep original screws, and enjoy a liberated, updated kitchen without hiring pros.
Powerwash and Stain Wooden Decks

After sprucing up your cabinets, shift the same DIY energy outdoors and tackle the deck—powerwashing and staining will bring weathered boards back to life and make your outdoor space feel like an extension of the kitchen.
Grab a pressure washing nozzle, scrub stubborn grime, let wood dry, then apply deck staining with a brush or roller. You’ll reclaim a pleasant, low-maintenance patio.